You are here: Home >> Polymer Clay Pendant Projects > Desert Rose Polymer Clay Crackle Tutorial
Desert Rose Polymer Clay Crackle Tutorial
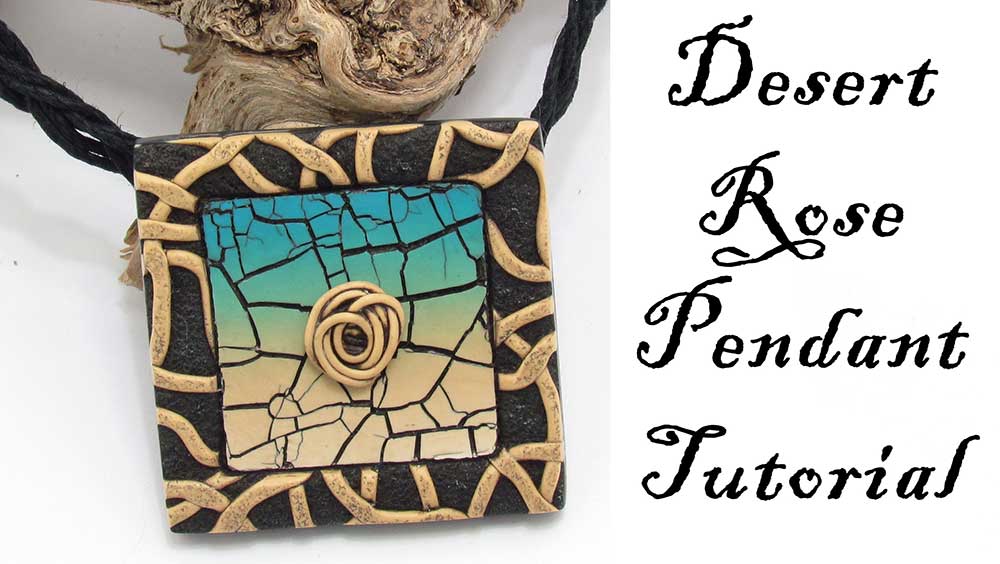
In this polymer clay crackle tutorial, I'll be showing you how to create a cracked earth, rustic crackle using a heat gun. We will also be learning how to create a contained 3-part Skinner Blend, a symmetrical border and exploring techniques with an extruder and antiquing.
Lots of fun techniques in this tutorial - have fun!
You will need the following supplies:
- Turquoise, white, ecru, black Premo polymer clay
- A tissue blade
- A pasta machine
- An acrylic roller
- A heatgun
- An oven
- Liquid clay
- An extruder
- Square donut cutter #5 - 5cm
- Soft square cutters
- A sand texture
- A crackle roller
- A tube/straw for making a bail
- Burnt sienna & black paint
- Deli paper
- A brush
- Sandpaper/ Polishing papers
- Renaissance wax
- A buffing tool
- Black hemp
- Silver cord ends
- Silver Jumprings
- Silver clasp
- Pliers
The Desert Rose Polymer Clay Crackle Tutorial Step by Step
Creating the Desert Crackle- To start with, we will be making a 3 part Skinner Blend with Premo Ecru, Turquoise and White.
- Fold your blend over as shown in the video to create a Skinner Blend log.
- Compress until the log is about the length of your chosen cutter.
- Flatten again using your roller, pinching the sides in to maintain the width of the blend.
- Roll through the thickest setting on the pasta machine. Fold and roll again.
- Use your tissue blade to slit through any air bubbles then roll through again.
- Cut out a strip from the best part of your blend, long enough to fit the cutter twice.
- Partially set the clay with your heatgun. You will know the top layer is cured when it goes from shiny to matte.
- Crack the clay using your fingers, add a layer of black clay rolled out on the second thinnest setting and then gently stretch it. See the video.
- When you're happy with your crackle, roll flat gently with your roller then trim away the excess black.
- Turn your clay black side up and cut using your chosen cutter. I am using a 3cm soft square cutter today.
- For this part you will need a Sand texture or coarse sandpaper, and a sheet of black polymer clay rolled out on the thickest setting.
- Texture your clay and trim away the excess.
- Place your black clay texture side up. Mark out a piece using your chosen cutter. I am using my #5 Square Donut cutter - 5cm.
- Use an extruder to make some Ecru snakes. (You can also do this by hand if you like.)
- Squish the snakes with your fingertips so that they are more organic looking, then randomly criss-cross them over your black clay.
- Gently texture the top of the snakes using your sand texture.
- Cut out along the mark you made previously using your donut cutter.
- Roll out a sheet of black polymer clay on the thickest setting. Texture using a texture of your choice. I am using my Crackle Roller.
- Trim up the edges.
- Lay your black backing, texture side down on a piece of deli paper.
- Lay the crackle on top, then fit the border around it
- Use the 4.5cm Soft Square cutter to trim out your pendant.
- Smooth off the edges using your fingertips.
- Roll out another sheet of black clay on the thickest setting and texture with the same texture you used on the backing.
- Trim out a strip and roll around a straw to make a bail, cut and smooth the seam.
- Position on the back of your pendant and use a skewer to press it gently onto the clay.
- Use a skewer to reinforce the join with translucent liquid clay.
- Extrude a thin snake of Ecru and roll it up into a rose shape.
- Bake the pendant and rose for an hour at the recommended temperature.
- For this part we are going to be using dark brown paint to antique the pendant. I am using burnt sienna mixed with a small amount of black.
- Use a soft brush to paint over the whole surface of the pendant and the rose.
- Remove some of the excess paint using the brush and allow to dry.
- Once dry, use a wet wipe to clean the sides of the pendant, then lightly brush the wet wipe across the front to remove most of the paint.
- Next give a good rub with a dry cloth to tidy it up.
- Clean up the rose with a wet wipe.
- Heat set both pieces with a heat gun then stick the rose to the middle of the pendant using translucent liquid clay.
- Bake for half an hour at the recommended temperature.
- Take six lengths of dark hemp cord. Push the ends into a cord end and squeeze it closed and add a clasp using a jumpring.
- Hook your cords onto something and then plait your cord.
- Attach a cord end to the second end.
- Sand the sides of the pendant from a 400 to 1200 grit.
- Lightly brush the front back and sides with renaissance wax and buff with a buffing wheel.
- Thread the pendant onto your cord and attach the second clasp.
Suggested links
links to Supplies
- Skinner Blend Cutters
- Square Donut Cutter#5
- Soft Square Cutters
- Crackle Roller
- Sand Texture Stamp
- Deli Paper
- Polishing Papers
- Buffing Wheels
- Extruder
If I have missed something, or you still have questions, please leave a comment below.
You can like my Facebook page or join the Jessama Tutorials Polymer Clay Community on Facebook to stay up to date with more polymer clay tutorials like this one as they are released.
You may also like:
You are here: Home >> Polymer Clay Pendant Projects > Desert Rose Polymer Clay Crackle Tutorial


Please leave your comments below: