You are here: Home >> Polymer Clay Pendant Projects > Japanese Garden Polymer Clay Transfer Tutorial
Japanese Garden Polymer Clay Transfer Tutorial
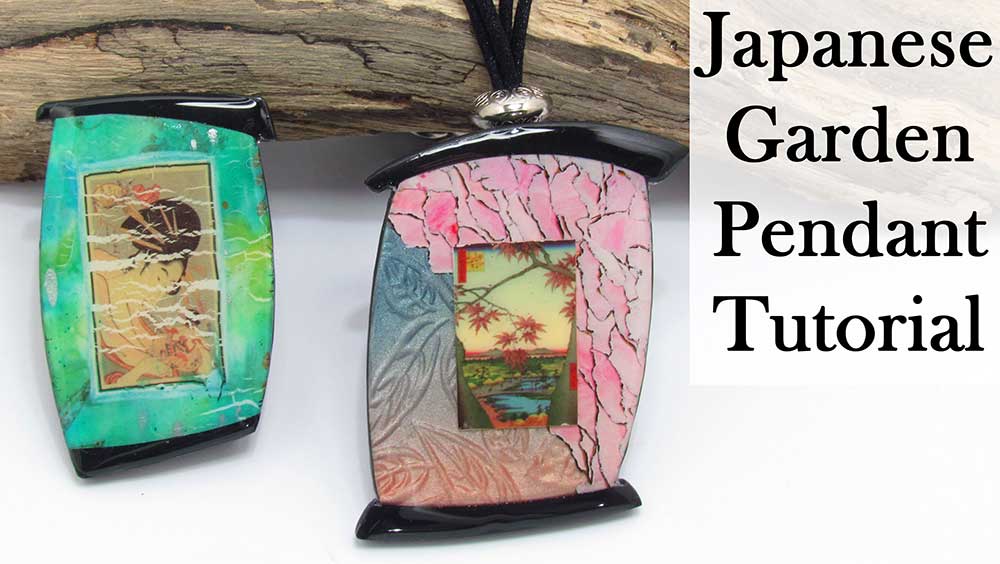
In this tutorial we will be creating a beautiful oriental pendant using a polymer clay transfer, a Cernit Metallics skinner blend mica shift and the ever popular watercolor technique.
I'll be showing you a different bail and stringing technique in this one, so be sure to watch to the end.
You will need the following supplies:
- White, black, white translucent, gold Premo polymer clay
- Rose gold, silver, steel Cernit metallic
- A tissue blade
- A pasta machine
- An acrylic roller
- Deli paper
- An oven
- A craft knife
- A Rockin' Rhomboid cutter set
- Image transfer
- Gelatos
- A kor roller texture
- A sand texture
- A tube for a bail
- Sand paper/ Polishing Papers
- Liquid clay
- Resin
- Silver bead
- Black rat’s tail cord
- Silver clasp
- Silver cord ends
- Silver Jumprings
Japanese Garden Polymer Clay Transfer Tutorial Step by Step
Creating The Veneer- To start with you will need to choose your image transfer. I am using an oriental polymer clay transfer from Lisa Pavelka's Fine Arts collection.
- Next we will be making a watercolor veneer using Premo Gold, Black and White. It's best if your clay is somewhat brittle.
- Run each color out on the thickest setting of your pasta machine and stack the sheets one on top of the other, gold at the top, white at the bottom.
- Trim the edges and then run through on the thickest setting again.
- Lay your clay white side up.
- You can do the next step using paints, mica powders, pastels or other mixed media. I will be using Gelatos: Red Cherry, Bubblegum, Passion Fruit, Lavender.
- Dab your mixed media across the surface of the clay in a random fashion, beginning with your lightest color, until the white is completely covered. If you are using paint, let it dry between each layer.
- Run out a sheet of Premo white translucent on your thinnest setting and lay it carefully over the Gelatos, smoothing out bubbles as you go. Trim away any excess.
- Run through on the thickest setting and then the middle setting. Continue until your clay is around half a mm thick.
- Next we will be creating a Mica shift on a 3 part Skinner Blend. I will be making my Skinner blend from Cernit Metallic: Steel, Silver and Rose Gold.
- Make sure your Skinner Blend is big enough for your chosen cutter. I will be using my largest Rockin' Rhomboid cutter today.
- Adjust if necessary - see the video.
- Make sure that your clay is firmly stuck to your work surface. Texture using a texture of your choice, the deeper the better. I am using a Kor Roller.
- Trim the edges.
- Use your flexible tissue blade to shave off the raised portions of your texture to create a mica shift. Cover with plain printing paper, or grease proof paper and burnish using your fingers or your acrylic rod. You can see more detail on how to do that in my Mica Shift Tutorial.
- Choose your favorite spot from the mica shift and cut it out.
- Cut down the middle using a curved flexible tissue blade. Remove one half.
- Tear pieces from your Gelato veneer and lay them along the edge of your mica shift. Continue layering until you have a big enough sheet.
- Cover with deli paper and press with your finger tips against the grain to create the water color effect. Then burnish flat.
- Lift from your work surface and lay on a piece of paper.
- Cut out your pendant using your chosen cutter and tidy the edges.
- Roll out a sheet of black to the same thickness as your veneer.
- Cut out a section using the cutter then line it up with the veneer. Use a flexible tissue blade to cut out a random curve. Leave an overhang on each side and round out with your blade. Repeat at the bottom. See the video.
- Either bake for half an hour, or set with a heat gun.
- Lay your piece, face down on a piece of deli paper.
- Run your leftover black clay through your pasta machine. Texture using the same texture you used for the mica shift.
- Lay over your piece as a backing and trim away the edges. Smooth away any finger prints.
- Roll out some more black. Texture with a rough texture. I am using my sand texture.
- Place texture side down and cut out a narrow strip.
- Wrap around a tube or straw to create a bail.
- Tidy the seam and sides.
- Repeat to make a second bail.
- Push the two bails together and trim off the bottoms. Attach to the back of the pendant using translucent liquid clay - see the video.
- Bake for around sixty minutes at Premo's recommended temperature.
- Allow to cool.
- Roll out a sheet of white Premo polymer clay as thin as you can get it.
- Cut out your image transfer and soak it in water.
- Gently lay it on the clay and trim around the edges.
- Leave to dry.
- First sand the front and back of your pendant using polishing papers, working through from your 400 to your 8000 grit.
- Add a black Jessama Smear to the edges.
- Add a light layer of translucent liquid clay to the back of your image transfer.
- Gently lay the image transfer on the front of the pendant and gently burnish flat.
- Bake at Premo's recommended temperature for half an hour.
- Mix up a small amount of resin. I am using Ice resin. See the video for the process. You can also use an Ice Resin Plunger to make it easier.
- Place your pendant on a silicone mat and cover with resin. Pull out to the edges using a skewer.
- Use a straw to blow over the resin to pop the bubbles.
- Allow to cure for 12 to 24 hours.
- Cut two equal necklace lengths of black satin cord.
- Thread through one of your bails and then back up through the second one so that you have four cords the same length.
- Thread on a large silver spacer.
- Crimp the two threads for one side into a cord end and repeat on the other side.
- Attach one piece of your clasp to each side using a jumpring.
Suggested links
- 3 Part Skinner Blend
- Skinner Blends made easy
- Watercolor Technique
- Mica Shift Tutorial
- Jessama Smear Technique
Supplies
- Sand Texture Stamp
- Rockin' Rhomboid Cutters
- Polishing Papers
- Deli Paper
- Silicone Resin Curing Mat
- Buy Cernit Metallics, Kor Rollers and Ice Resin Plunger at Linda's Art Spot
If you are struggling with the Ice Resin, you can find a full Tips and
Techniques tutorial that walks you through the process on my Patreon community page or in my Etsy Shop.
If I have missed something, or you still have questions, please leave a comment below.
You can like my Facebook page or join the Jessama Tutorials Polymer Clay Community on Facebook to stay up to date with more polymer clay tutorials like this one as they are released.
You may also like:
You are here: Home >> Polymer Clay Pendant Projects > Japanese Garden Polymer Clay Transfer Tutorial




Please leave your comments below: