Kelp and Bubbles Polymer Clay Pendant Project
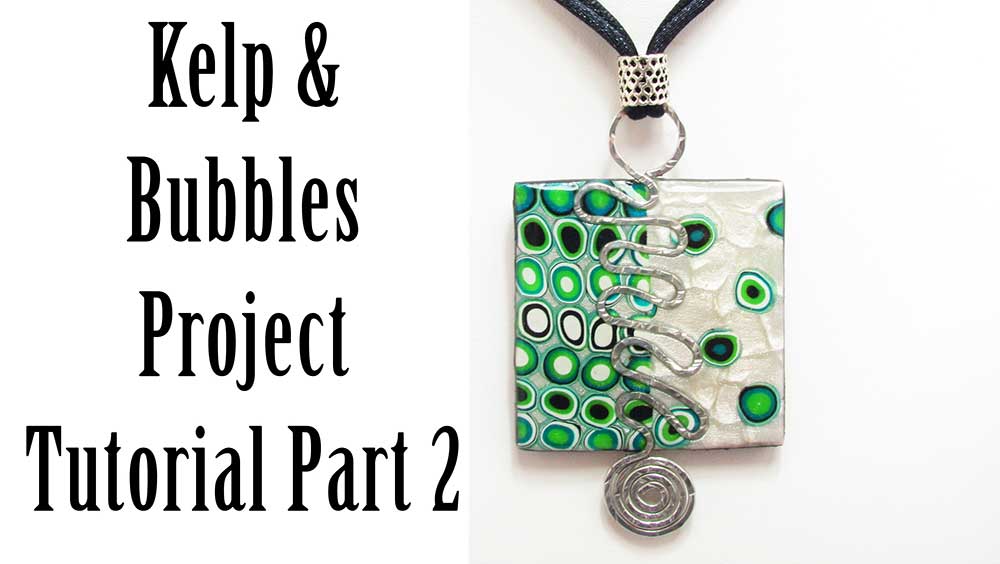
This polymer clay pendant project is part two of the Kelp and Bubbles earring project. In this second part we will be using the mod cane we made in part one to create a beautifully, eye-catching pendant with a hammered wire insert. This tutorial includes lots of information on burnishing, joining seams and using Ice Resin. I love how this pendant came out. I hope you enjoy making it.
If you haven't seen part one of the tutorial yet, you can find the link to it in the suggested links box below the video.
You will need the following supplies:
- Pearl white and black premo polymer clay
- A mod cane
- Deli paper
- A square cutter
- Texture stamp (cracked earth, cracked lava)
- A craft knife
- Silver mica powder
- A pasta machine
- An acrylic roller
- A tissue blade
- An oven
- Silver wire
- A hammer
- A steel block
- Resin
- Sandpaper/ Polishing papers
- Polybonder
- Rats tail cord
- A silver spacer
- Silver cord ends
- Silver clasp
- Silver Jumprings
- Pliers
Kelp and Bubbles Polymer Clay Pendant Project Step by Step
Creating the Kelp Veneer- To start with, you will need a sheet of Premo pearl white polymer clay rolled out at about 2mm thick.
- Texture using the same texture sheet you used in part one of this series. I will be using my Cracked Earth Texture.
- Trim away the edges, then shave the raised sections away to create a mica shift.
- Cover with deli paper and burnish flat.
- Choose a cutter, place on the mica shift veneer and trim around it to save the excess clay. I will be using my square cutters today.
- Bring over your Mod Cane from part one of this series, and slice thin slices from various sections.
- Spread them over your mica shift, leaving plenty of open space, then replace the deli paper and burnish again.
- Place to the side.
- To start with, you will need a sheet of Premo pearl white polymer clay rolled out at about 1mm thick.
- Use your chosen cutter and trim around it to save the excess clay as before.
- Slice some more thin slices from various sections of your Mod Cane and lay them side by side in rows on your pearl white sheet until it is full.
- Cover with deli paper and burnish flat.
- Trim up the edges.
- Cut off a length of 16 gauge silver wire.
- At one end create a coil and then make a 90 degree angle in the remaining wire.
- Use your round nose pliers to bend the rest of the wire back and forth into a snake shape.
- Continue until the snake is the length of your cutter then create another right angle and use a mandrel plier to finish in a loop.
- Hammer the wire with the ball point of your hammer.
- Use your pliers to correct any distortion in the shape.
- See the video for details.
- Polish the wire with a silver polishing cloth.
- Roll both sheets through the thickest setting of the pasta machine.
- Trim one side of each veneer with a tissue blade so that the veneers are ready to join.
- Lay the two sheets carefully together, cover with deli paper and burnish with your fingers until the seam is eliminated.
- Cut out your pendant using your cutter, and lay the wire component down the middle.
- Burnish the wire into the clay and then remove to leave an imprint.
- Use your cutter to trim your clay again, then burnish away any fingerprints.
- Set with your heat gun or by placing in the oven for 15 minutes.
- Roll out a sheet of black clay on the thickest setting of your pasta machine.
- Texture using a texture sheet of your choice. I will be using the reverse stamp of the one I used on the pearl white. This one is called cracked lava.
- Place your cutter on the clay and roughly trim away the excess clay.
- Dust with silver mica powder.
- Use a tissue sprayed with alcohol to wipe away the mica powder from the raised areas.
- Flip the black clay over and place the Kelp and Bubbles veneer on top.
- Trim up and tidy the edges.
- Place on a piece of deli paper, then bake for an hour at the recommended temperature.
- Once cooled, use black polymer clay to finish up the edges using the Jessama Smear Technique.
- Bake for a further 20 minutes.
- Once cool, sand the front, back and sides all the way from a 400 to an 8000 grit.
- Paint the back of your wire piece with polybonder, then place in position on your pendant.
- Allow to dry, then use a tissue soaked in alcohol to remove any excess glue that spilled onto the clay.
- Mix together a small amount of your chosen resin. I'm using Ice Resin. If you need a step by step walk through on using Ice resin correctly, see my tutorial.
- Place your pendant on a silicone resin mat.
- Carefully cover your pendant with Resin. See the video.
- Leave to cure for 12 hours then remove any resin spills from the pendant - see the video.
- Fold two pieces of black rat's tail satin cord in half. Loop through the wire loop on the pendant and thread on a large silver spacer.
- Trim the cords so that they are all the same length.
- Twist two pieces of cord into one cord end, and the other two pieces into another cord end.
- Attach a clasp using jump rings.
Suggested links
supplies
- Square Cutters
- Cracked Earth Silicone Stamp
- Cracked Lava Silicone Stamp
- Silver Mica Powder
- Polishing Papers
- Deli Paper
- Buy the Ice Resin Plunger at Linda's Art Spot
If you are struggling with the Ice Resin, you can find a full Tips and
Techniques tutorial that walks you through the process on my Patreon community page or in my Etsy Shop.
If I have missed something, or you still have questions, please leave a comment below.
You can like my Facebook page or join the Jessama Tutorials Polymer Clay Community on Facebook to stay up to date with more polymer clay tutorials like this one as they are released.




Please leave your comments below: