Painted Art Polymer Clay Pendant Tutorial
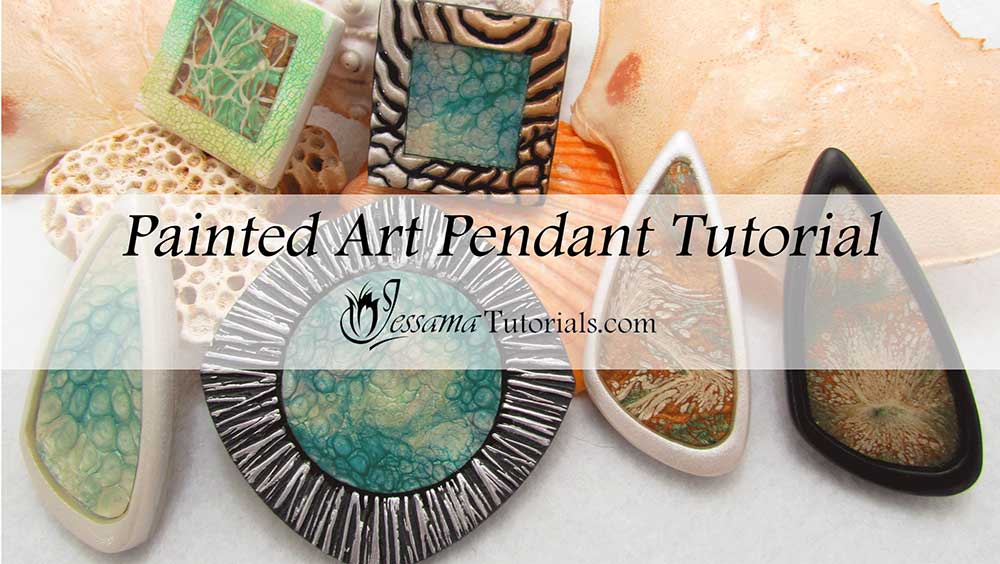
In this tutorial I'll be showing you how to make a painted art polymer clay pendant using your own polymer clay bezel and Pebeo paint skins made with Pebeo Prisme and Moon paints.
I'll be showing a whole lot of different effects that can be achieved with these paints depending on how you combine them. The result can be somewhat unpredictable, so prepare to experiment and enjoy the process.
You will need the following supplies:
- Pearl white polymer clay
- Pearl ex (antique copper and emerald)
- Pebeo Paint Moon (Vermeil, Apricot, Emerald)
- Pebeo Paint Prisme (Eggshell White, Leaf, Caribbean Blue, Ash Blue)
- Teflon or baking paper
- A pasta machine
- A tissue blade
- An acrylic roller
- A cutter (I’m using my Football cutters from JessamaDesign)
- An oven
- Lisa Pavelka’s Poly Bond
- A craft knife
- Ice resin
How to Make A Painted Art Polymer Clay Pendant
Making the Pebeo Paint Skins- I will be using Pebeo Paint Moon Vermeil, Apricot, and Emerald, and Pebeo Paint Prisme Eggshell White, Leaf, Caribbean Blue and Ash Blue.
- Thoroughly mix your paints before you begin, until the paint takes on a pearly effect with no veins. The mixing is very important to make sure you get the full blooming effect from the paint.
- Tape down a teflon or baking paper sheet to your work surface.
- We will start with a Moon Paint skin. Drip your Moon paints in any pattern you like onto the teflon or baking paper sheet, one color at a time. Use a skewer to manipulate the pattern and close up any gaps.
- The second skin is a Moon, Prisme combination. I've mixed Prisme Eggshell and Leaf with Moon Vermeil. Lay down your two Prisme paints first and make a pattern you are happy with. Then add the Moon over it, sparingly, because the Moon paint will stop the reaction of the Prisme.
- The third skin is a Prisme skin. I'll be mixing Eggshell White, Caribbean Blue and Ash Blue. Drizzle them one color at a time to make a random pattern.
- See the video for more information on making the skins and manipulating the patterns.
- Allow to cure for 24-48 hours until the skins feel papery. If the paint is still tacky, let it dry for longer.
- To start with, you need a sheet of pearl white polymer clay (I'm using Premo) run through the thickest setting of your pasta machine.
- You'll also need mica powders to match your paints. I'm using Pearl-ex Emerald and Antique Copper.
- Lay down a good strip of each color on your polymer clay sheet leaving a strip of uncolored pearl white.
- Fold your clay in half, keeping the colors in their lanes and run it through your pasta machine. Fold and run through over and over until the powders are mixed into the clay.
- Fold over into a log and compress to make the blend shorter. See the video.
- Cut in half and place one piece next to the other so that you have six stripes. Condense and repeat so that you end up with twelve stripes.
- Compress into a squarish slab.
- Use the blunt side of a tissue blade to cut the slab into patterned pieces. (See video).
- Squish back together.
- Shave with a flexible tissue blade to create a few mica shift sheets.
- Choose your favorite pieces to make your bezel.
- Squish the leftovers back together and run through the thickest setting.
- Place one of the mica shift pieces on top and roll again through the thickest setting.
- Decide what shape you would like your bezel to be and choose a set of cutters. You need two cutters of the same, or different shapes, one larger than the other. I'll be using my Football cutters today.
- Take your smaller cutter and cut into your clay sheet. Remove the cutter, but leave the clay in place.
- Use your larger cutter to cut around the first cut to create a border.
- Recut the middle using the smaller cutter, then remove this piece with the tip of your craft knife. You should be left with just a border in the shape of your cutter.
- Clean up the edges.
- Roll the leftovers through the thickest setting and cover with another of your mica shift pieces.
- Roll through the thickest setting again and place face down on your work surface.
- Lay your border piece over it.
- Place the smaller cutter back in its place and use your tissue blade to push the border into shape.
- Cut again with the largest cutter and remove the excess.
- Smooth off the sides with your tissue blade and fingertips.
- Bake for a full hour at the recommended temperature.
- Give the back, sides and frame a good sand, starting with a 400 grit, and going all the way through to the higher grits.
- Add a light layer of renaissance wax to the front, sides and back of your bezel.
- Give a good buff with a soft polishing cloth and allow the renaissance wax to cure for at least ten minutes.
- For this part of the tutorial I am going to use some bezels that I have already made using my Fangle cutters.
- Choose one of your pebeo skins and use the smaller of the cutters you used to make your bezel as a window to choose a part of the skin that you like.
- Press down firmly with your cutter to leave a good imprint.
- Cut out the shape using a craft knife or pair of scissors.
- Check it against the bezel and trim to shape if necessary. You want a snug fit.
- Place inside the bezel and press around the edges with a small ball tool.
- Remove and paint the bottom of your bezel with poly bond or other compatible glue.
- Replace the Pebeo skin and push in with the ball tool. Try to get it nice and flat.
- Repeat with your other skins and bezels.
- Leave to dry for at least 24 hours.
- Fill your bezel with Ice Resin. See the video for the process. I also have an Ice Resin Tutorial for step by step help if you struggle with resin.
- Allow to cure for 24 hours.
Suggested links
- Football Cutters
- Fangle Cutters
- Fire and Ice Polymer Clay Bezel Tutorial
- Polymer Clay Pendant Fractals Tutorial
- Sutton Slice Tutorial
- Reptile Crackle Tutorial on Etsy
- Reptile Crackle Tutorial on Patreon
- Buy the Ice Resin Plunger and Pebeo starter kits at Linda's Art Spot
If you are struggling with the Ice Resin, you can find a full Tips and
Techniques tutorial that walks you through the process on my Patreon community page or in my Etsy Shop.
If I have missed something, or you still have questions, please leave a comment below.
You can like my Facebook page or join the Jessama Tutorials Polymer Clay Community on Facebook to stay up to date with more polymer clay tutorials like this one as they are released.



Please leave your comments below: