Steampunk Polymer Clay Window Pendants
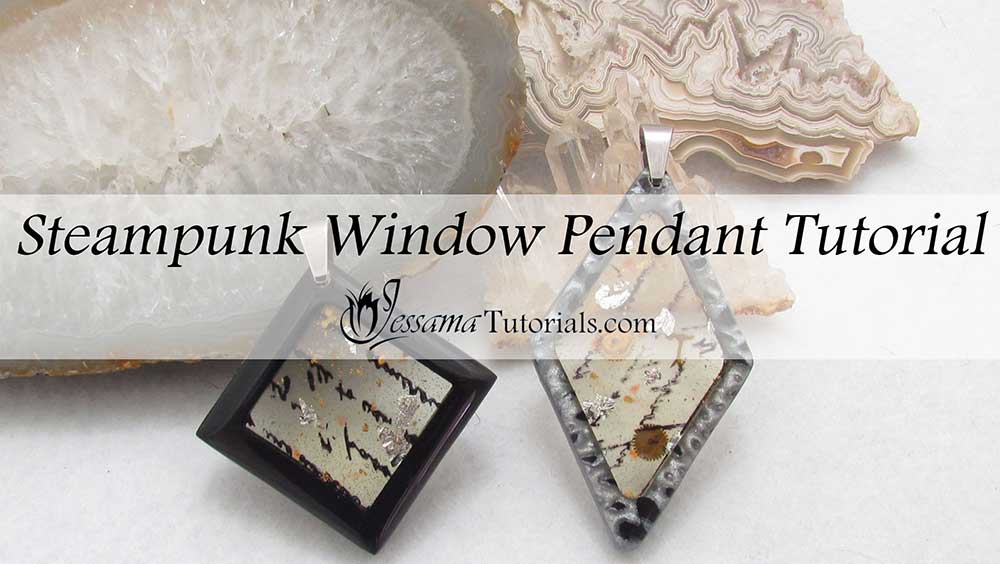
In this steampunk polymer clay tutorial I’ll show you a cool technique I’ve been
working on for a few months now; how to suspend liquid clay sheets in polymer
clay bezels.
I’ll show a relatively simple liquid clay sheet to demonstrate
how to suspend the sheet, but this technique can be used on any liquid clay
sheet you make. It’s easy, effective and a fun way to incorporate liquid clay
into your designs.
You will need the following supplies:
- Translucent kato liquid clay
- Metal leaf
- Jet Black and Rusty Brown Staz-on Ink
- Lisa Pavelka’s love letter stamp
- Polymer clay Reef Bed stamp
- Silver and black polymer clay
- Cutters (I’m using my Diamond cutters)
- Plain printing paper
- Cogs
- A brush
- Tissue paper
- An acrylic roller
- A craft knife
- A pasta machine
- Gold mica powder
- A heat gun
- Ice resin
- A pin drill
- Sandpaper
- Tweezers
- A bail
- Readymade rubber cord
How to Make Steampunk Polymer Clay Window Pendants Step by Step
Making the Frames- To start you’ll need a sheet of black polymer clay rolled out on your thickest setting.
- You also need a sheet of silver rolled out at your thickest setting and then doubled up.
- Use a skewer or pin or both to jab down into your silver. Continue jabbing until you’ve created a spotted pattern over the entire sheet. Or you can use the Reefbed stamp I used in the tutorial.
- Dust the stamp with corn starch and press your silver polymer clay into the stamp. This will give you a dappled pattern. Trim up the edges.
- Shave the raised part of the pattern off the clay. Don’t go too deep. The goal is to get the shavings not the mica shift.
- Now take your black sheet, trim it up and place your shavings onto the black. Burnish flat with your acrylic roller and a sheet of paper.
- Once flat use whichever cutters you’ve chosen to cut two frames from your sheet. I'm using my Diamond set from JessamaDesign.
- Leave the frames on your work surface. Don’t pick them up! Use a heat gun to bake them enough to set them or put your surface into your oven for a few minutes if it will fit.
- Tidy up your frames before baking.
- Bake two of these frames for 40 minutes in the oven.
- For the next step you’ll need translucent liquid clay. I’m using Kato liquid clay.
- Squeeze a bit of liquid clay out onto a ceramic tile and spread thinly using your fingertips. Sprinkle a bit of gold mica powder over the liquid clay. You can add some small pieces of silver leaf too.
- Bake this with a heat gun for about a minute on your highest heat. Make sure it is properly cured and clear. Don't worry about burning it. Liquid clay is very hard to burn. Allow the clay to cool before adding another layer of liquid clay.
- Bake with your heat gun again. Allow it to cool again. Make sure it is properly cured. If it is still cloudy, heat again.
- Take a stamp and dab some black ink over the raised parts of it. I’m using Lisa Pavelka’s Love Letter Stamp. Press the stamp down onto the clay and lift to reveal the pattern.
- Lastly take some brown ink and use a brush to apply some of it to the clay in small drops.
- Apply another layer of liquid clay and place a few cogs in the clay.
- Bake with your heat gun again.
- It's very important that each liquid clay layer is properly cured, and completely clear before adding the next layer.
- Take your frames out of the oven and allow them to cool.
- Place one of the frames in the spot you’d like to cut out of the liquid clay. Hold the frame down onto the liquid clay and trim around the edge to cut out the liquid clay.
- Heat the liquid clay together with the frame using your heat gun. Allow this to cool.
- Spread a thin layer of liquid clay around the edge of the other frame and place this onto the liquid clay. You should have a sandwich: frame, liquid clay, frame. It will form a double sided bezel.
- Bake this for half an hour. Allow to cool.
- Now smear silver clay around the edge of the double sided bezel to hide the seams.
- Smooth away any finger prints.
- Place this in the oven for another half an hour.
- Sand the double sided bezel once cool to remove blemishes.
- Now you can apply resin to one side of the bezel. Allow this to cure and then turn and resin the other side. Allow this to cure.
- Use a pinch bail on the top of your liquid clay pendant and string onto a ready made rubber cord necklace.
Suggested links
- Reefbed Polymer Clay Stamp
- Diamond Cutters from JessamaDesign
- Jessama Smear Technique
- Mica Frills Tutorial
- Square Cutters on JessamaDesign
- Liquid Clay Bezel Tutorial
If you are struggling with the Ice Resin, you can find a full Tips and
Techniques tutorial that walks you through the process on my Patreon community page or in my Etsy Shop.
If I have missed something, or you still have questions, please leave a comment below.
You can like my Facebook page or join the Jessama Tutorials Polymer Clay Community on Facebook to stay up to date with more polymer clay tutorials like this one as they are released.


Please leave your comments below: