Boiling Bubbles Polymer Clay Design
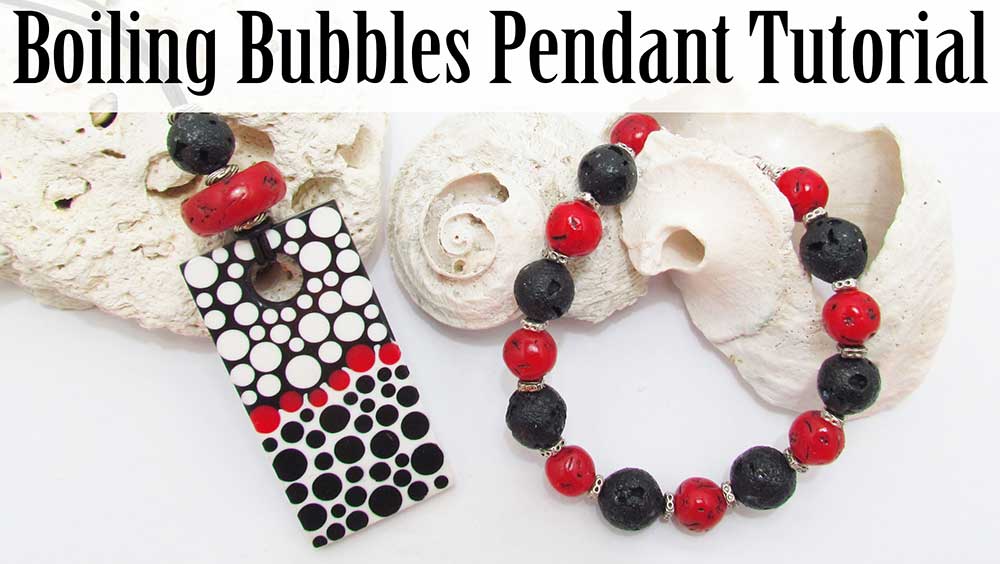
This Boiling Bubbles polymer clay design is a follow on from my Faux Coral and Lava tutorial. If you haven't seen that video, you'll need to watch it before you continue with this one. You'll find the link to the tutorial in the suggested links box below the video.
In this tutorial I'll be showing you how to use a basic back-filling technique to create a stunning modern pendant to go with the Faux Coral and Lava bracelet. The polymer clay techniques in this project are fun to do, and I'll show you all the tips and tricks you need to make it nice and easy to achieve a great result.
You will need the following supplies:
- Cernit Polymer Clay (black, white, coral red)
- Lava and coral bead
- Mini circle cutters
- Micro circle cutters
- A pasta machine
- A tissue blade
- An acrylic roller
- An oven
- 1\2 square maxi cutters
- Sandpaper
- Polishing papers
- A buffing wheel
- Renaissance Wax
- Leather Cord
- Cord ends
- Clasp
- Jumprings
- Pliers
How to Make My Boiling Bubbles Polymer Clay Design Step by Step
Gathering your Supplies- To start with, you will need a strip of white and black Cernit rolled out on the thickest setting of your pasta machine.
- You will also need a sheet of either black or white rolled out on your thinnest setting and a small amount of the coral from the faux coral and lava tutorial rolled out on your thickest setting.
- Next you'll need a selection of small circle cutters. (I'll be using the three smallest from my Mini Circles Set, as well as my micro circle cutters from JessamaDesign.)
- Lastly you will need a cutter for your pendant. I will be using a half square from my Maxi half square set, but you can use whatever shape you like.
- Lay your three strips of clay on your tile. Cover with a piece of deli paper and burnish onto your tile to make sure the clay is well stuck.
- Start with your smallest cutter and cut out a few circles of black and white. Continue cutting out more circles working up though your sizes.
- Cut out several circles from your coral clay using the three largest micro circles.
- Gently remove the excess clay leaving the circles on your tile.
- Either place your tile in the oven for 30 minutes or use your heat gun at its lowest wind speed to set the circles.
- Allow to cool.
- Gently lift the circles from your tile using your blade.
- Lay your thin sheet of white on a piece of deli paper.
- Use your pendant cutter to make an impression in the clay to plan your design around.
- Lay the coral dots along the center of your pendant in a random line.
- Use a small round cutter to mark a circle near the top center of your pendant.
- Start at the edge and lay your circles all over the pendant. Black above the red line, white below. Make sure to stay within the boundaries of your pendant impression.
- Use your cutter to cut out your pendant piece.
- Roll a piece of white polymer clay and a piece of black polymer clay into sausages. Marble them together.
- Roll out on setting 6 of your pasta machine (about 1.5mm) and lay on a piece of deli paper.
- Lay your veneer over the top of the marbled backing and cut out using your cutter. Use your circle cutter to remove the circular piece near the top of the pendant.
- Bake for a full hour at Cernit's recommended temperature.
- Take some of your black clay, warm it in your hands and roll into a small sausage. Lay it along the edge of your red circle strip on the white circle side.
- Repeat with a white strip on the black circle side.
- Continue to cover the rest of the pendant with black clay over the white circles and white clay over the black.
- Make sure to go over the edges.
- Use your tissue blade to carefully shave away as much of the clay as you can.
- If any cracks appear, just push the clay back in.
- Trim away the excess clay from around the edges.
- Bake for 30 minutes.
- Sand using wet/dry sandpaper, starting from a 120 grit up to a 1200 grit. Remember to do the sides and back.
- Polish with polishing papers from a 400 grit up to 8000.
- Buff with Renaissance wax using a soft cloth or rotary tool.
- Bring over the faux coral rondelle and lava bead that we made in the faux coral and lava tutorial.
- Double up a piece of leather cord and string the loop through the hole in the bead. Thread the ends of the cord through the loop and tighten.
- String on a silver spacer, the coral rondelle, another spacer, the lava bead and a final spacer.
- Trim your leather to the correct length and add a cord end to each end.
- Attach your clasp using jumprings.
Suggested links
Supplies
- Half Square Maxi Cutters
- Mini Circle Cutters
- Micro Circle Cutters
- Polishing Papers
- Buffing Wheels
- Deli Paper
- Buy Cernit Clay at Linda's Art Spot
If I have missed something, or you still have questions, please leave a comment below.
You can like my Facebook page or join the Jessama Tutorials Polymer Clay Community on Facebook to stay up to date with more polymer clay tutorials like this one as they are released.


Please leave your comments below: