You are here: Home >> Polymer Clay Pendant Projects > Stamping Polymer Clay: Twilight Woods Project
Stamping Polymer Clay: Twilight Woods Project
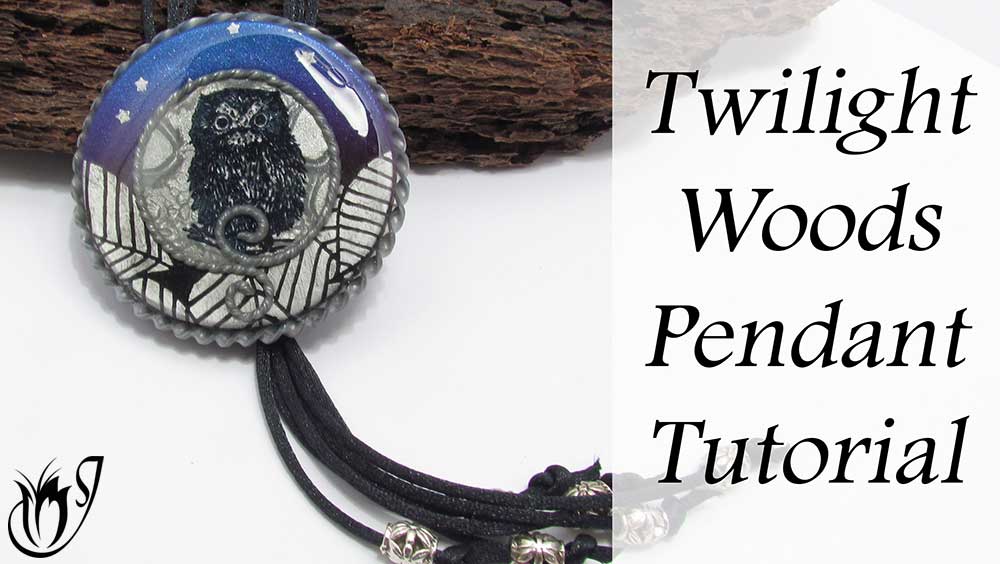
In this stamping polymer clay tutorial we will be making a pendant with a twilight woods theme using a Skinner Blend, Mica Shift, stencils and stamping.
This is a fun versatile polymer clay design that can be adapted to many different themes. You can switch it up by using fall colors and a squirrel, spring colors and birds or summer colors and flowers, bees or butterflies. Those are just a few ideas. See what you can come up with and make your own design.
You will need the following supplies:
- Stencils
- Ultramarine, purple, silver, pearl white, black premo polymer clay
- A tissue blade
- A pasta machine
- An acrylic roller
- An oven
- Plain printing paper
- A brush
- Silver alcohol ink
- A moon texture
- An owl stamp
- Black stazon ink
- Donut cutter (cutter #5, 6cm)
- Circle cutter (6cm in diameter)
- UV resin
- A straw
- A heat gun
- A UV lamp
- Liquid clay (translucent)
- Rats tail cord (Black)
- Silver Spacers
Twilight Woods Stamping Polymer Clay Project Step by Step
Creating the Pendant- To start with, you will need a 3 part Skinner blend made up of black, purple and a color mix of 3 parts Cobalt to 1 part Silver.
- Pass it through the pasta machine on the thickest setting.
- Next you'll need a donut cutter. (I'll be using my #5 donut with a 6cm diameter).
- Cover the skinner blend with a stencil of your choice and roll onto the clay with your roller. (I'll be using my Forest Floor Stencil).
- Shake up your silver mixative alcohol ink and use a small soft brush to paint over your stencil around the leaves over the dark part of the skinner blend. You may need two coats.
- Once dry, gently lift your stencil and clean it with soap and water.
- Cover with plain paper and use your fingers to smooth away the imprint.
- Cover your clay with a second stencil and repeat in the other areas of the Skinner blend. (I'll be using a Star Stencil).
- Cover with plain paper and use your fingers to smooth away the imprint again.
- Next mix up your second color recipe - 1 part Pearl White, 1 Part Silver for your mica shift.
- Texture the clay using a texture of your choice. (I'll be using my Raised Moon Craters texture).
- Gently press your clay onto your tile then shave off the raised areas with your flexible blade.
- Cover with plain paper and burnish using your fingers to flatten the clay.
- Trim away the edges then roll through your pasta machine to about 0.8mm thick. Roll out some of the leftovers to the same thickness and place behind the mica shift to create a sheet of around 1.6mm thick.
- Use the donut cutter to cut out the middle circle.
- Stamp the circle using a stamp of your choice and black Stazon ink. (I'll be using my Owl stamp).
- Put aside and allow to dry.
- Use your donut cutter to cut out your pendant piece from the skinner blend and remove the center.
- Cover the owl center with plain paper and burnish to remove any excess ink.
- Position in the center of your donut.
- Cover with plain paper and burnish gently using your fingers.
- Set your clay using a heat gun or by baking for 15 minutes then allow to cool.
- Roll out a sheet of black clay on your thinnest setting and cut out a 6cm circle. Use it to cover the back of your donut.
- Texture using a piece of sandpaper then place owl side up on a piece of paper. Trim the edges using a craft knife and smooth using your fingers.
- Roll out a long thin sheet of your silver/pearl mix to 1mm thick. Cut out a thin strip and twist it. Cut off the untidy ends.
- Brush a thin layer of Bake and Bond around the owl center of your pendant. Curve one end of your twisted snake into a spiral, place it between the owl's feet, then lay the rest of the twisted snake around the edge of your owl center.
- Curve the end into a second spiral and position below the first one. Secure them to one another with a drop of bake and bond.
- Cut a second wider strip and twist again, wrap it around the outside of the donut after brushing with Bake and Bond.
- Bake for an hour at Premo's recommended temperature.
- Roll out a sheet of black clay and trim it up, then wrap it around a straw. Trim and smooth the seam. Trim away the ends then cut out three pieces from the length of clay. Remove the excess then set the three pieces with a heat gun.
- Once cool, gently remove from the straw.
- Use Bake and Bond to attach the three bails to the back of the pendant - see the video.
- Bake again for another hour.
- Once cool, lay on a resin mat and apply your resin over the owl and then around the outside frame. I am using Magic Gloss. Use a toothpick to drag it out to the edges and pop any bubbles. Add more resin as needed. Cure under a UV lamp for about 5 minutes then apply a second layer and cure for 30 minutes.
- Paint the back with a thin layer of UV resin and cure again.
- Cut three long lengths of Rat's tail cord.
- Thread one end through the left bail and the other end through the right bail, and then both ends through the bottom bail.
- Add a silver spacer bead to the end of each cord and tie a knot. Neatly snip the ends.
- Pull on the cords to even them out.
color recipes
- 1 - 3 parts Premo Cobalt, 1 part Premo Silver
- 2 - 1 part Premo Silver, 1 part Pearl White
Suggested links
Supplies
- Circle Donut #5 - 6cm
- 6cm Circle Cutter
- Forest Floor Stencil
- Star Stencil
- Raised Moon Crater Texture Stamp
- Owl Stamp
- Deli Paper
- Resin Mat
If I have missed something, or you still have questions, please leave a comment below.
You can like my Facebook page or join the Jessama Tutorials Polymer Clay Community on Facebook to stay up to date with more polymer clay tutorials like this one as they are released.
You may also like:
You are here: Home >> Polymer Clay Pendant Projects > Stamping Polymer Clay: Twilight Woods Project



Please leave your comments below: