Daisy Chain Polymer Clay Project
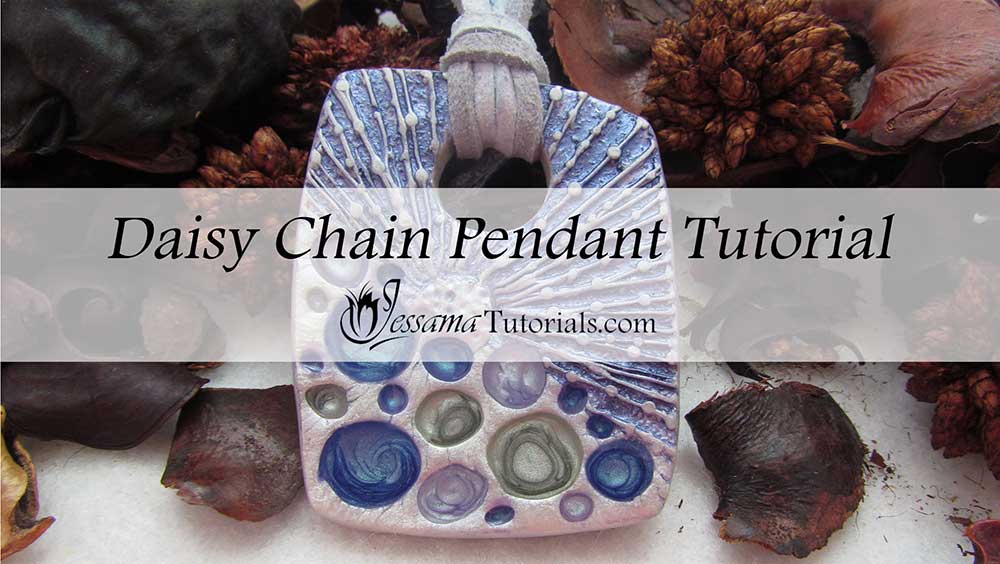
In this polymer clay project, I'll show you how to make a textured polymer clay pendant, with small bezels that we will fill with Pebeo paints and resin. I'll share some tips on how to manipulate the paint in small spaces and how to fill the small spaces with resin without it running over.
You can adapt the project to create many different pieces. Just change up the shape, texture, colors or all three. This is a very versatile polymer clay project, using a combination of basic techniques. Perfect for beginners.
You will need the following supplies:
- Pearl white polymer clay
- A texture stamp (I'm using my StarBurst one from JessamaDesign)
- Large ball tools
- A tissue blade
- A pasta machine
- An acrylic roller
- A spray bottle filled with water
- Mini circle cutters
- A cutter of your choice (I'm using a Rockin' Rhomboid cutter from JessamaDesign)
- An oven
- Paint (I’m using Dazzling Metallic Purple Pearl, Ice Blue and Black Pearl)
- A paint brush
- Pebeo paint (I’m using Prisme Moonstone, Ash Blue and Marina)
- A skewer
- Ice resin
- Grey and purple suede
- A silver clasp
- Two silver jumprings
- Two silver JBB crimp findings
How to Make My Daisy Chain Polymer Clay Project Step by Step
Making the Bezel- To start with, you will need a sheet of pearl white Premo rolled out on the thickest setting of your pasta machine.
- Lay your chosen texture sheet face up on your work surface. (I'll be using the StarBurst texture from JessamaDesign.)
- Spray your texture with water.
- Lay your sheet of clay over the top and spray the clay with water.
- Work the clay into the stamp with your fingertips starting from one side of the stamp to the other.
- Smooth the clay with your fingers and then release from the stamp.
- Dry up all the water from your work surface and your clay.
- Lay your clay sheet texture side up on the work surface.
- Choose the part of the stamped clay where you want to add your Pebeo paints, and smooth it out with a large ball tool.
- Use your cutter to cut out your pendant shape. (I am using the Rockin' Rhomboid shape from JessamaDesign.)
- Use your small circle cutters to cut different sized holes out of the smoothed part of your pendant.
- Roll a piece of pearl white Premo through the second thinnest setting of your pasta machine, and lay your textured piece over it. Trim around the edges and smooth out the seams.
- Use a blunt tool to distort the circle shapes slightly.
- Create a second textured sheet for the back of the pendant using a sheet rolled through on the middle setting of the pasta machine.
- Place it pattern side down on your work surface and lay the pendant front over it.
- Trim up the edges and smooth out the seam.
- Use a small circle cutter to cut a hole from the top center to create a donut pendant.
- Use a small ball tool to smooth out the bezel circles.
- Bake for a full hour at Premo's recommended temperature.
- Finish off the sides of the pendant using the Jessama Smear technique.
- Bake for another half an hour.
- Once cooled, antique your texture using paint colors of your choice. I'm using Dazzling Metallics Ice Blue, Purple Pearl and Black Pearl.
- Brush the paint lightly into the gaps of your texture on the front and back of the pendant.
- Use a wet wipe to gently wipe the surface paint away.
- Bake for about 15 minutes to set the paint.
- Fill the holes in your pendant using Pebeo paints of your choice. (I am using Ash Blue, Marina and Moonstone.)
- Mix the paints well before you use them and drip them in using the end of a skewer.
- Leave the paint until it's tacky and then swirl it using a pin to add interest to the cells.
- Leave the Pebeo paint to cure for around 6 weeks.
- Using the pointy end of a skewer, add Ice Resin to the cells over the Pebeo paint. I'm using the Ice Resin plunger to avoid problems with measuring. Make sure to mix the resin thoroughly before using. See the video for more detail.
- Allow the resin to cure for about 24 hours.
- String two lines of suede through the top hole as per the instructions on the video.
- Line the suede pieces up and trim them to the same length.
- Add a crimp end on either end.
- Use a jump ring to add the pieces of the clasp to either side.
Suggested links
- StarBurst Stamp
- Rockin' Rhomboid Cutters
- Mini Circle Cutters
- Jessama Smear Tutorial
- Buy the Ice Resin Plunger at Linda's Art Spot
- Buy micro circle cutters
- Buy Ball and Molding tools at Createalong
If you are struggling with the Ice Resin, you can find a full Tips and Techniques tutorial that walks you through the process on my Patreon community page or in my Etsy Shop.
If I have missed something, or you still have questions, please leave a comment below.
You can like my Facebook page or join the Jessama Tutorials Polymer Clay Community on Facebook to stay up to date with more polymer clay tutorials like this one as they are released.



Please leave your comments below: