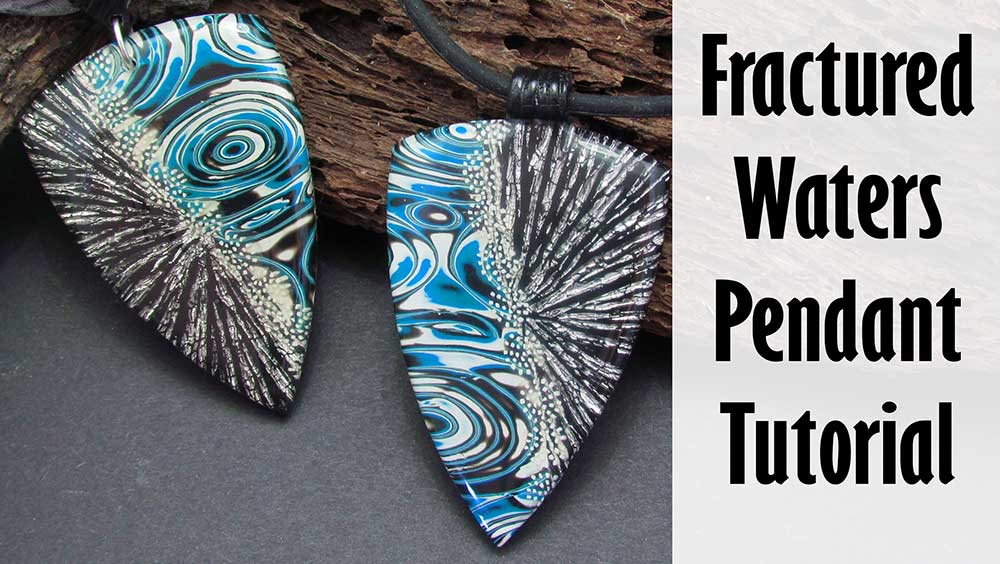
Fractured Waters Polymer Clay Pendant Tutorial
This fractured waters polymer clay pendant tutorial is made up of a beautiful combination of lots of easy, fun techniques. This video is full of tips and tricks to help you get the most out of them.
I'll show you how to remove the seams between your veneers, how to deal with distortion, an easy way to make sure your bail is symmetrical and much more in this video.
New polymer clay techniques are great to learn, but sometimes all you need are a few basics and the right execution to make your creations come alive.
You will need the following supplies:
- Kato white, black, turquoise (Or premo black, white, turquoise)
- Premo white translucent
- Graduated circle cutters
- Graduated Mini Circle Cutters
- A pasta machine
- An acrylic roller
- A tissue blade
- Maxi Convex Spearhead cutter
- Long diamond cutters
- A texture stamp (frozen fractures stamp)
- Silver leaf
- Tape
- An oven
- Magic gloss resin
- Sandpaper/ Polishing papers
- Sari ribbon
- Ready made rubber cord
- Silver clasp
- Silver Jumprings
- Silver cord ends
- Pliers
My Fractured Waters Polymer Clay Pendant Tutorial Step by Step
Making the Mokume Gane- To start this clay pendant tutorial, you need three sheets of polymer clay: Black, white and Turquoise, run through the thickest setting of your pasta machine. (I'm using Kato)
- Use a large rectangular cutter to cut out a piece from each sheet.
- Stack the pieces on top of one another and push together.
- Roll through the pasta machine on the thickest setting, short end first.
- Trim up then cut in half. Lay one piece over the other. Repeat.
- Roll through the pasta machine on the thickest setting again, short end first.
- Trim up the sides. Cut and stack.
- Use some small graduated cutters to create your Mokume Gane pattern. I am using circles from my circle set and mini circle set on JessamaDesign.
- Press the cutters all the way through your stack and create a graduated pattern - see the video.
- Use your tissue blade to press in around the edges to stick the pieces back together.
- Roll over using your acrylic rod.
- Lift from the tile and press the sides together to reduce the size of the slab and stick everything back together.
- Press your slab hard onto your tile to stick it down.
- Use a sharp thin (flexible) blade to shave the top layer away from your stack. Reduce further if the pattern is still too big.
- Continue shaving, periodically pressing back into shape.
- Put the slices aside.
- For this part you will need a texture stamp, a sheet of black polymer clay rolled out on your thickest setting, and some metal leaf. Today I will be using my Frozen Fractures stamp.
- Trim up the edges of your clay and smooth your metal leaf sheet onto your clay. Gently press down around the edges, then use your craft knife to remove the excess.
- Lift the clay from your tile, and place it metal leaf side down onto your stamp.
- Dust the top of your clay with cornstarch, then press the clay into the stamp, starting from one side and working your way across.
- Gently lift your clay out of your stamp. Trim up the edges.
- Lay a piece of packing tape over your clay and gently burnish it on. Then gently lift it off to remove some of the leaf.
- Repeat until you have removed the metal leaf from all of the raised parts of your texture.
- Roll out a long strip of Premo translucent.
- Roll a piece of white Kato into a long sausage. Repeat with a piece of translucent.
- Lay alternating logs of white and translucent along your translucent strip until it is full. Make sure that you end up with a translucent log on at least one end.
- Gently roll your strip up like a jelly roll, beginning with the translucent log.
- Bend the strip over the last log to make sure that it is encapsulated in the translucent.
- Reduce your cane to around 0.5-1cm in diameter.
- Roll up some of your trimmings and pass through your pasta machine on the middle setting.
- Place one of your Mokume Gane pieces onto the sheet. Roll through the thickest setting.
- Trim up the edges. Make sure it is big enough for your chosen pendant cutter. Today I will be using the second cutter in my Maxi Convex Spearhead set.
- If not make a second piece. Place them together. Cover with plain paper and burnish together.
- Use your cutter to cut a piece from your Mokume Gane sheet and a piece from your Lisa Pavelka Peel.
- Stack the pieces one on top of the other without sticking them together.
- Curve your blade and cut through both pieces. Take them apart.
- Put the matching Mokume Gane and Lisa Pavelka Peel pieces together.
- Cut again using your cutter.
- Cut a few slices from your reduced cane.
- Lay them down the seam of your pendant. Repeat for the second one.
- Cover with plain paper and burnish the cane slices onto the pendant using your fingers. Be careful not to flatten out the texture.
- Pick up your pendants and lay them on a piece of paper.
- Roll out a sheet of black Kato on the middle setting and texture using the same stamp.
- Trim it up, then lay the backing over the back of the pendants.
- Use a cutter one size down to cut out your pendant. This makes sure that any distorted parts are removed.
- Smooth out the edges with your finger.
- Add a bail to your pendant. (See the video)
- Bake at the recommended temperature for an hour.
- Sand using polishing papers starting from 400 grit to 8000 grit. Do the front, back and sides.
- Lay your pendants on a resin mat and cover with Magic Gloss. See the video for the procedure.
- Place under the UV lamp for at least 15 minutes.
- Use a pin drill to drill a hole through the bottom of your diamond bail and the top of your pendant.
- Join together using a jumpring.
- Thread one pendant onto a ready made rubber cord.
- Thread the second pendant onto a piece of Sari Ribbon.
- Add a crimp cord end to either end of the ribbon.
- Attach your clasp using jumprings.
Suggested links
Where to Buy supplies
- Statement Rectangle Cutter
- Circle Cutters
- Mini Circle Cutters
- Maxi Convex Spearhead Cutters
- Long Diamond Cutters
- Frozen Fractures Stamp
- Silver Leaf
- Polishing Papers
- Pin Drill
If I have missed something, or you still have questions, please leave a comment below.
You can like my Facebook page or join the Jessama Tutorials Polymer Clay Community on Facebook to stay up to date with more polymer clay tutorials like this one as they are released.



Please leave your comments below: