You are here: Home >> Polymer Clay Pendant Projects > Under The Sea Polymer Clay Medallion
Under The Sea Polymer Clay Medallion Tutorial
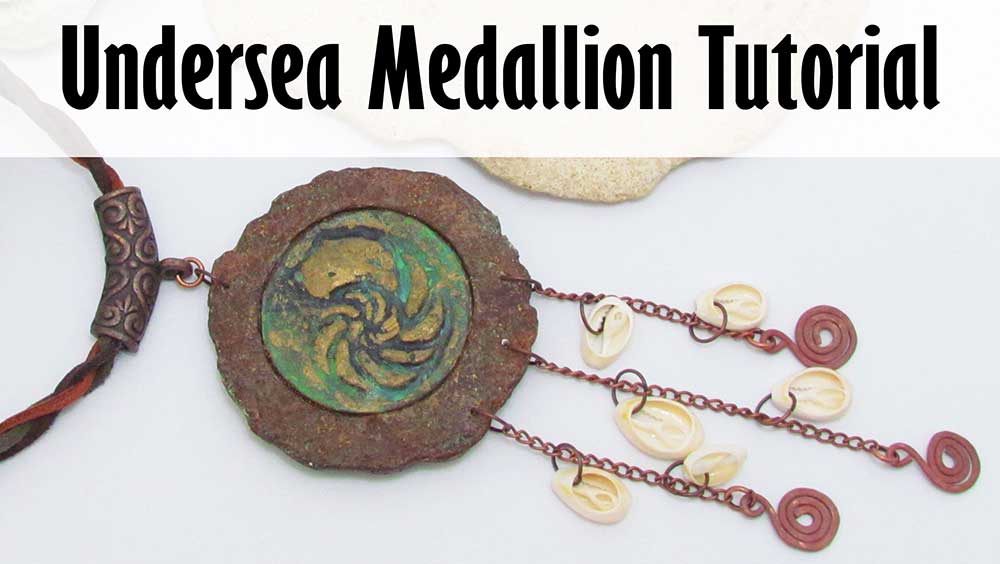
This Under the Sea polymer clay medallion is a great excuse to have some fun and mess around with Christi Friesen's fabulous Swellegant range.
This is a very unpredicable medium, but I've been testing it out on various projects for quite a while now, so hopefully, in this project I will be able to give you some pointers to bring it a little more under control and we will end up with a beautiful rusted polymer clay medallion.
Have fun!
You will need the following supplies:
- White polymer clay
- Texture stamp (Sand and Nautilus Shell)
- Tissue blade
- Pasta machine
- Craft knife
- Swellegant (copper, bronze, brass, iron)
- Swellegant patina’s (Rust and Gold-Green Verdigris)
- Swellegant clear sealant
- Sandpaper
- Copper wire
- Pliers
- Hammer
- Steel block
- Circle cutters
- Oven
- Brush
- Brown paint
- Buffing wheel
- Pin drill
- Antique copper chain
- Shells
- Antique copper bail, clasp, Jumprings, cord ends, eye pins and cones
- Suede (dark green, dark brown, rust)
How to Make My Under the Sea Polymer Clay Medallion Step by Step
Making the Medallion- To start with, you will need a sheet of Premo rolled out on the thickest setting of your pasta machine.
- Dust each side with cornstarch.
- Texture half the clay with your chosen texture stamp - I am using my Sand stamp from JessamaDesign.
- Texture the other half with your chosen image stamp - I am using my Nautilus stamp from JessamaDesign.
- Cut out the nautilus using a circle cutter.
- Lay the same cutter over your textured clay and roughly trim 1cm around the outside with a frilly outline.
- Lay your Nautilus in the middle and trim until you are happy with the size.
- Use the same cutter, place over the Nautilus and cut a circle from the textured clay.
- Apply Swellegant prep to both pieces using a brush.
- When dry use a piece of coarse sandpaper to tap along the edges of your donut to roughen the edges up a bit.
- Lift up your pieces gently with a tissue blade, and lay on two separate pieces of deli paper.
- Add Swellegant to your Nautilus - I am using Bronze, Copper and Brass. Add in thin coats. Start with the bronze leaving a few white patches. Fill in the gaps with copper. Add a touch of brass in the last open space, and add some over the other areas.
- Leave to dry. Add a second coat and a third if necessary.
- Add Swellegant to your textured donut. I am adding Iron.
- Leave to dry. Add a second coat and a third if necessary.
- While your second or third coat is still wet on your Nautilus add your Gold-Green Verdigris Patina. I am just dropping it on with a wet wipe, and dabbing. Cover with the wet wipe and leave for an hour.
- While your second or third coat is still wet on your textured Donut add your Rust Patina. I am just dropping it on with a tissue, and dabbing. Cover with the soaked tissue and leave for an hour.
- Remove the coverings and allow to dry for 20 minutes more.
- Highlight the Nautilus with Swellegant Brass.
- Fit your two pieces together.
- Place a textured piece of clay on the back and trim using a craft knife.
- Use coarse sandpaper to press lightly around the edges.
- Bake for an hour at your brand's recommended temperature.
- Make three copper wire spirals.
- Texture both sides using a ball hammer.
- Buff them up using a polishing cloth.
- Add a small amount of Tiffany Rust into a cup and drop your spirals in. Leave for about an hour to antique them.
- Remove them, and dry them. Return the leftover Patina to its pot and rehammer the spirals.
- Cover any white areas with brown paint to tidy the edges.
- Cover the back with Swellegant prep and allow to dry.
- Cover with a full layer of Swellegant Copper. Make sure to do the sides too. Allow to dry and then add a second coat.
- While the second coat is still wet, dab on a few spots of iron.
- Place on a tissue and pour a small amount of Tiffany rust onto the back. Move around with a skewer.
- Leave for half an hour or until completely dry.
- Re-highlight the Nautilus with some more brass.
- Seal the front and back with Swellegant Sealant.
- Bake for 15 minutes.
- You can apply a light layer of Renaissance wax and buff if you like.
- Use a pin drill to drill three holes along the bottom of your medallion.
- Put a copper jumpring through each hole.
- Cut three pieces of copper chain, one longer than the other two. Attach to the jumprings with the longest piece in the middle.
- Add a wire spiral to the bottom of each chain using a jumpring.
- If you have some, attach some open shells randomly on your chain pieces.
- Use your pin drill to drill a hole through the top of the medallion opposite the middle bottom hole.
- Put a jumpring through the hole and attach a bail.
- Cut three pieces of suede in colors of your choice.
- Place all three pieces in a cord end and crimp together.
- Slip the cord ends onto the loop of an eyepin and cover with a cone.
- Create a loop with the excess wire.
- Plait your cords and pass them through your bail.
- Finish off the other end in the same way.
- Use jumprings to attach your clasp.
Suggested links
Where to Buy supplies
- Sand Texture Stamp
- Nautilus Shell Stamp
- Circle Cutters
- Buffing Wheels
- Pin Drill
- Deli Paper
- Swellegant Range at Linda's Art Spot
If I have missed something, or you still have questions, please leave a comment below.
You can like my Facebook page or join the Jessama Tutorials Polymer Clay Community on Facebook to stay up to date with more polymer clay tutorials like this one as they are released.
You may also like:
You are here: Home >> Polymer Clay Pendant Projects > Under The Sea Polymer Clay Medallion


Please leave your comments below: