You are here: Home >> Polymer Clay Pendant Projects > Day on the Lake Polymer Clay Pendant
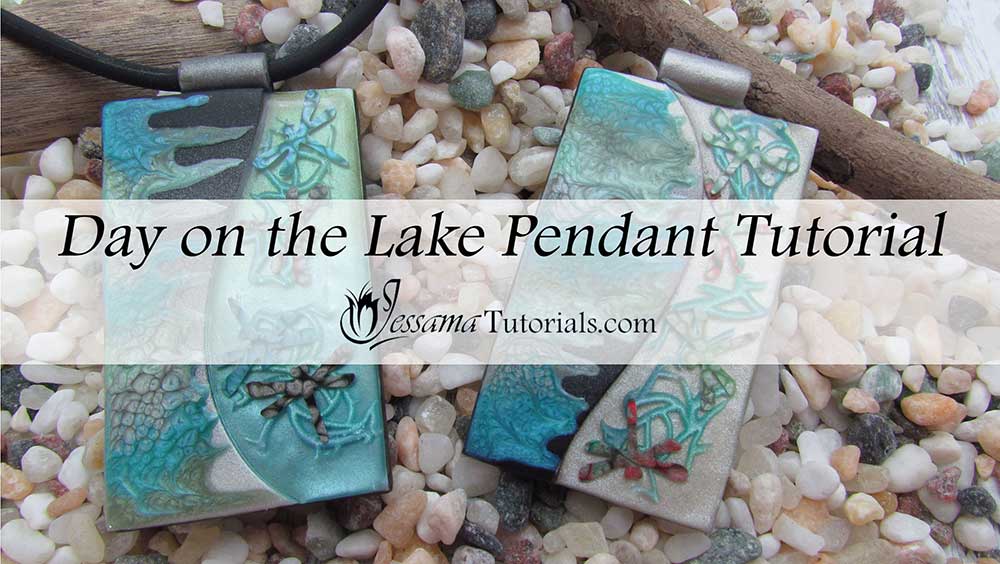
A Day on the Lake Polymer Clay Pendant Tutorial
In this tutorial I'll be showing you how to make a focal polymer clay pendant with a difference. We will be exploring new ideas for using Pebeo paints and mica frills along the way.
There are lots of different techniques in this project so it's quite long, but really fun to make.
You will need the following supplies:
- Pearl white and black polymer clay (I’m using Premo)
- Alcohol ink (I’m using Adirondack Sailboat Blue, Clover, Mermaid and Turquoise)
- Pearlex powder (I’m using Sky Blue and Spring Green)
- Pebeo Prisme paint (I’m using Leaf, Almond Green, Turquoise, Caribbean Blue, English Red, Onyx, Moonstone and Emerald)
- A kor roller or other texture stamp (I’m using Winters Frost)
- A dragonfly die cutter
- A rectangle cutter (I'm using the largest from my Rectangle Set on Jessama Design)
- A tissue blade
- A pasta machine
- An acrylic roller
- A skewer
- An oven
- Sponge texture for the back
- Bake and bond liquid clay
- Black acrylic paint
- A Teflon sheet
- A soft paint brush
- A very small paint brush
- A spray bottle of water
- Sandpaper or polishing papers
- Ice resin
- A ready-made rubber cord necklace
A Day on the Lake Polymer Clay Pendant Step by Step
Making the Pebeo Skin for the Dragonflies- To start with, we will be making a Pebeo paint skin.
- Lay your Teflon sheet down on your work surface. Stick it down at the corners to keep it flat.
- Choose the Pebeo Prisme paints that you want to use for your dragonflies. I'm using Carribean Blue, Turquoise and Moonstone. Give them a good mix before you use them.
- Drip your paints onto your Teflon using a skewer.
- Lift up your Teflon by the corners and spread the paint out a bit. You can mix it up a bit with a piercing pin or skewer if you want to.
- Leave your skin to dry for 24 to 48 hours until it feels like paper when it's peeled off of the Teflon. If it feels tacky, it's not ready.
- Later in the video I show some more skins that I made using Onyx and English Red, and another using Emerald, English Red, Onyx and Moonstone.
- For this part you will need a Skinner Blend of black to pearl white polymer clay.
- Cut a piece from your sheet using your chosen cutter so that you include some black and white. (I'm using the largest cutter from my rectangle set on JessamaDesign.
- Then use your flexible tissue blade to cut the piece in half with a curved line.
- Roll out a sheet of pearl white on the thickest setting of your pasta machine.
- Take one half of your Skinner Blend piece and lay it on the sheet of Pearl White and cut out with your rectangular cutter.
- Use your blade to smooth along the edges.
- Repeat with the other half of the Skinner Blend piece to create a second pendant.
- Bring over your chosen mica powders. I'm using Sky Blue and Spring Green
- Use a brush to dab them onto the pearl white so that they blend into one another.
- Roll out a piece of your Skinner Blend on the middle setting of your pasta machine and trim it up.
- Roll it around your skewer and cut where the clay meets.
- Smooth out the seam and position the bail along the top of your pendant with the seam joining the pendant. Gently press it on.
- Repeat for your second pendant.
- Use your blade to trim the edges.
- Bake for around forty minutes at the recommended temperature.
- For this part we are going to be using pearl white clay tinted with alcohol inks.
- Choose the alcohol inks you want to use to tint your pearl white clay. I'm using Sailboat Blue, Turquoise, Mermaid and Clover.
- Drip some of each ink onto a piece of pearl white clay and allow to dry for a few minutes.
- Once dry, mix your inks into your clay by first hand-kneading it and then using your pasta machine.
- Roll pieces of each color into cylinders and lay them next to one another in any random order.
- Push them together to stick them to one another then run them through the pasta machine to create a blend.
- Stick your sheet down onto your work surface and spray it with water.
- Roll from one side to the other using your Kor roller (or texture using your texture sheet). I'm using the Winter Frost Kor roller.
- Dry your clay.
- Use your flexible tissue blade to shave off the raised pieces and set them aside.
- Gently remove the bail from the pendant to be replaced later.
- Roll the remainder of your black and white Skinner Blend through the middle setting of your pasta machine.
- Cut out a rectangle for your backing.
- Cover the back of your baked pendant with a thin layer of Bake and Bond.
- Place your backing piece on top and pull on it slightly to stretch it a bit bigger than the pendant.
- Fold the sides over and smear them to fill in any cracks.
- Scrape off excess clay using your blade.
- Scrape off any marks you can see to tidy up the edges.
- Hold the pendant by the sides and smooth off the back using your fingers.
- Use a sponge or other light texture to texture the back.
- Bake for another 30 minutes.
- When your Pebeo paint is cured, peel it from the Teflon and use your chosen die cutter to cut out a few shapes. I'm using dragonflies.
- If the paint is properly cured it should cut just like paper.
- Use a high grade, black acrylic paint to cover the sides of your pendant. You need a fairly thick layer.
- Smooth it out with your finger and run the paint on your fingers across the back to antique it lightly.
- Wipe the area where your bail was with a wet wipe to remove the paint.
- Re-attach the bail using a line of Bake and Bond.
- Bake again for another 30 minutes.
- After cooling, sand the front of your pendant and the bail using polishing papers or sandpaper. Start from your lowest grit (400) up to the highest grit (8000).
- Don't sand the sides or back, or the part of the pendant with the mica powders on it.
- I'm using Moonstone, Turquoise, Almond Green and Leaf Prisme paint.
- Mix your paints well, then using a skewer, streak your paint across the raised part of your pendant. (See the video.)
- Leave to dry for at least 24 hours.
- Gently place your mica frills on the side of your pendant without the Pebeo paint to work out your design.
- Do the same with the dragonflies.
- Remove them and set them aside and bake the mica frills for 30 minutes.
- Mix together a small amount of your chosen resin. I'm using Ice Resin. If you need a step by step walk through on using Ice resin correctly, see my tutorial.
- Place your pendant on a silicone resin mat and apply a thin layer of resin to the side without the Pebeo paint.
- Place your baked mica frills on the resin layer and add a second layer to cover the mica frills.
- Add your dragonflies, shiny side up and gently press them down so that the resin spills over them.
- Add another layer of resin to cover the dragonflies completely.
- Watch for a while to check for bubbles that are trapped. Work them to the surface with a piercing pin and then blow over them with a straw to pop them.
- Cure for at least 24 hours.
Suggested links
- Rectangle Cutters
- How to Make a Skinner Blend
- Buy the Winter Frost roller, Pebeo paints and Ice Resin Plunger at Linda's Art Spot
- Premade Rubber Cord Necklace on Firemountaingems.com
If you are struggling with the Ice Resin, you can find a full Tips and
Techniques tutorial that walks you through the process on my Patreon community page or in my Etsy Shop.
If I have missed something, or you still have questions, please leave a comment below.
You can like my Facebook page or join the Jessama Tutorials Polymer Clay Community on Facebook to stay up to date with more polymer clay tutorials like this one as they are released.
You may also like:
You are here: Home >> Polymer Clay Pendant Projects > Day on the Lake Polymer Clay Pendant


Please leave your comments below: