Faded Summer Polymer Clay Fan Necklace Tutorial
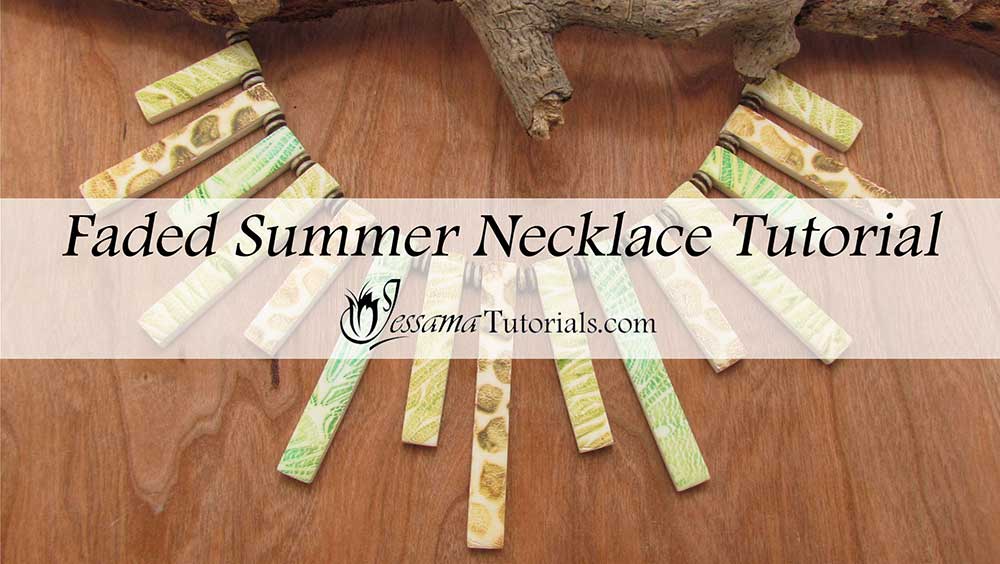
This polymer clay fan necklace tutorial is the third part of my Faded Summer series. I'll be showing you how to make a beautiful necklace using the faded summer alcohol ink crackle veneers. I’m going for a tribal theme to match the colors we’re using, but this crackle technique can be used in an endless range of necklace designs, so don’t be afraid to experiment.
The links for part one - the alcohol crackle sheet tutorial, as well as part two -the polymer clay cuff, are in the suggested links box below the video.
You will need the following supplies:
- Pearl white polymer clay
- Wrapped Collar Cutters
- Alcohol ink crackle sheets
- A tissue blade
- A pasta machine
- An acrylic roller
- An oven
- Plain printing paper
- A dremel to buff
- Renaissance wax
- A pin drill
- Accu-flex
- Jumprings
- Crimps
- Charlotte crimps
- Clasp
- Bone beads
- Pliers
- Sandpaper/ Polishing Papers
Faded Summer Polymer Clay Fan Necklace Step by Step
Preparing the Back of the Veneers- To start you’ll need the alcohol crackle sheets from part one.
- Trim off the edges of your crackle sheets and add these leftovers to the pile of leftovers from the previous two tutorials. (The alcohol crackle sheets and the Faded Summer Cuff)
- Roll the leftovers into a log. Twist the log and form into a long square cane.
- Cut the log into slices and layer those slices over the back of each of your crackle veneers.
- Take a piece of plain printing paper and place your crackle sheet onto it, crackle side down. Place another plain piece of printing paper over the back of your crackle sheet. Burnish with your roller until the slices from your leftover cane are smoothed out.
- Trim the sides of your veneers again and you’re ready to start cutting out your pendants.
- To start with you will need your chosen cutters. I’ll be using my Wrapped Collar Cutters today, but you can use any cutter you want.
- I’ve arranged mine in this pattern; one being the largest and eight being the smallest. 8,4,7,3,6,2,5,1,5,2,6,3,7,4,8
- I’ve chosen my pebble sheet to be my middle pendant, but this is entirely up to you.
- Bring over your middle pendant (1) and cut out a pendant from your sheet. Make sure you're pressing with the crackle side of your sheet facing up.
- Lift away the sheet and trim away any straggles of clay that might be left around the edges of the pendant.
- Pick up the pendant using your tissue blade and smooth off the back and sides using your finger. Be careful not to distort your shape.
- Place it on a piece of paper once finished and repeat with your other crackle sheets until you have a whole necklace. I was able to make two necklaces from my sheets.
- Pop your pendants into your oven for a full hour at your brand's recommended temperature. Bake them on a ceramic tile on a piece of plain printing paper with another sheet of plain printing paper over the top of them.
- Once out of the oven allow the pendants to cool.
- When they’re cool use a pin drill to drill through the sides of the pendants.
- Give the sides and backs of the pendants a sand. Start with a 400 grit all the way up until your highest grit.
- Now use some renaissance wax (the wax isn’t necessary, but gives a bit of extra shine to the buff) and wipe it over each of your pendants; sides, backs and fronts.
- Use a rotary tool with a buffing wheel to gently buff your pieces. Allow each pendant to dry for around ten to fifteen minutes before handling.
- To start you’ll need an 18 inch long piece of black accu-flex.
- Crimp a crimp on one of the ends of the accu-flex. Slide a charlotte crimp up the other end and close around the crimp.
- Link a jumpring through the charlotte crimp's loop and slide a clasp onto the jumpring. Close the jumpring and that's one end finished.
- String two bone rondels and one of your pendants, repeating until you’ve used up all of your pendants.
- Repeat the crimping on the other end of the accu-flex. Just slide your charlotte crimp onto your accu-flex before crimping your crimp this time.
Suggested links
- Part One - Alcohol Crackle Sheets
- Part Two - Faded Summer Cuff
- Buffing Wheels available on JessamaDesign
- Wrapped Collar Cutters
If I have missed something, or you still have questions, please leave a comment below.
You can like my Facebook page or join the Jessama Tutorials Polymer Clay Community on Facebook to stay up to date with more polymer clay tutorials like this one as they are released.


Please leave your comments below: