You are here: Home >> Polymer Clay Jewelry Projects > Faux Amethyst Geode Slice
Faux Amethyst Geode Slice Project Tutorial
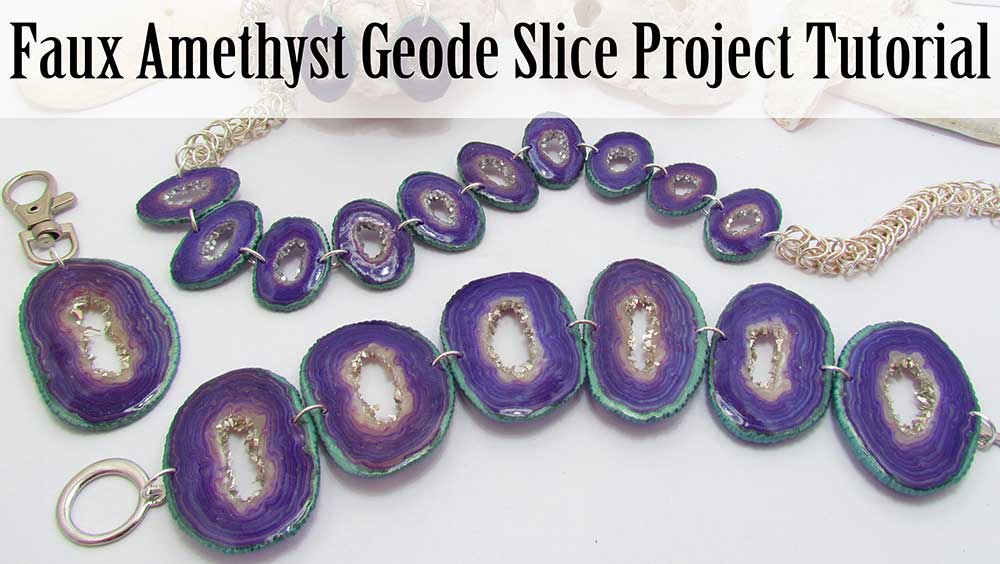
In this tutorial I'll be showing how to make a Faux Amethyst Geode Slice which we will then use to make a full jewelry set, as well as a keyring. This polymer clay project is much easier than it looks, and best of all it requires no sanding, so it's sure to be a favorite!
You can switch up the colors used in this technique to create all sorts of different agate slices, so be sure to try out other combinations.
You will need the following supplies:
- Cernit (Translucent violet, violet, translucent, turquoise metallic)
- Pearl white premo
- A tissue blade
- A pasta machine
- An acrylic roller
- A needle tool
- A craft knife
- An oven
- Deli paper
- Piñata ink blanco blanco
- Translucent liquid clay
- Silver glitter
- Silver druzy
- A pin drill
- Varathane
- Jumprings
- Clasps
- Pliers
- Earring wires
How to Make My Faux Amethyst Geode Slice Bracelet
Creating the Faux Amethyst Cane- You need Cernit Translucent violet, Cernit Violet and Cernit translucent and Premo Pearl white.
- You will also need to mix 1 part Cernit violet with 2 parts Cernit translucent.
- Use your tissue blade to chop up a ball of unconditioned Premo pearl white into small pieces. (Roughly 1oz of clay)
- Repeat with an equal amount of Cernit translucent.
- Separate all your pieces out, then mix the white and translucent together.
- Ball the pieces together and chop again.
- Bring the pieces together and roll into a log and twist.
- Scrunch back into a ball and then shape into a thick log around 1 inch long. This will be used as the core of your geode.
- Wrap your log in a thin sheet of translucent violet. Roll to smooth out seams.
- Use a needle tool to press ridges around the cane.
- Add a couple of drops of white alcohol ink to the outside of the cane and spread all over.
- Cover with a layer of translucent. Smooth the seams and repeat the indentations.
- Cover with a layer of the color mix. Smooth the seams and repeat the indentations.
- Add another layer of white alcohol ink.
- Continue these steps, adding layers of randomly alternating colors, keeping to the lighter colors near the center and working out to darker at the outer edge.
- Wrap the polymer clay cane with a final layer of Cernit Turquoise Metallic. Give a final roll and add the indentations.
- Roll back into a round to create folds in the clay.
- Reduce to a good size for the jewelry you want to make.
- Place in the freezer to set.
- Once your polymer clay cane has cooled, place it on your work surface lodged between two balls of Blu-Tac to keep it still. Cut off a good number of slices.
- Mold the slices into a nice oval shape using your fingers.
- Use a needle tool to roughen the edges.
- Place on a piece of deli paper. Cover with a second piece and burnish to smooth out any fingerprints.
- Cut off a piece of the cane and reduce to a smaller size. Cut a good number of slices from this cane too.
- Repeat the process used to shape and burnish the larger pieces.
- Use a craft knife to roughly trim out the centers. Use your needle tool to roughen the edges.
- Bake at the recommended temperature for 40 minutes.
- Once cooled, brush the centers of your small slices with translucent liquid clay.
- Place one slice at a time on a piece of deli paper and tap silver glitter over the slice.
- Tap off the excess and brush over with your finger to remove overhanging pieces.
- Repeat with the larger slices, using silver druzy this time.
- Bake for 30 minutes.
- Use a pin drill to drill your pieces. The necklace and bracelet pieces on either side, the earring and keyring pieces, with one hole at the top.
- String onto a piece of wire, and dunk into your varnish.
- Allow to drain, then suspend the wire so that the pieces are separated and allow to dry for an hour.
- Repeat twice more.
- Once dry, remove from the wire and check that your drilled holes are clean.
- Choose your favorite side of each slice, lay them side by side, and join together using jump rings. Keep adding until you have enough for a necklace.
- You can have the slices going all the way around or add a piece of chain with a clasp to each end. I am using some chain mail I made.
- Link the larger pieces together in the same way to make a bracelet.
- Add a jumpring and earring wire to the top of each earring slice.
- Add a jumpring and keyring piece to the top of the keyring slice.
Suggested Links
Buy Supplies
If I have missed something, or you still have questions, please leave a comment below.
You can like my Facebook page or join the Jessama Tutorials Polymer Clay Community on Facebook to stay up to date with more polymer clay tutorials like this one as they are released.
You may also like:
You are here: Home >> Polymer Clay Jewelry Projects > Faux Amethyst Geode Slice


Please leave your comments below: