Faux Agate Polymer Clay Dagger Tutorial
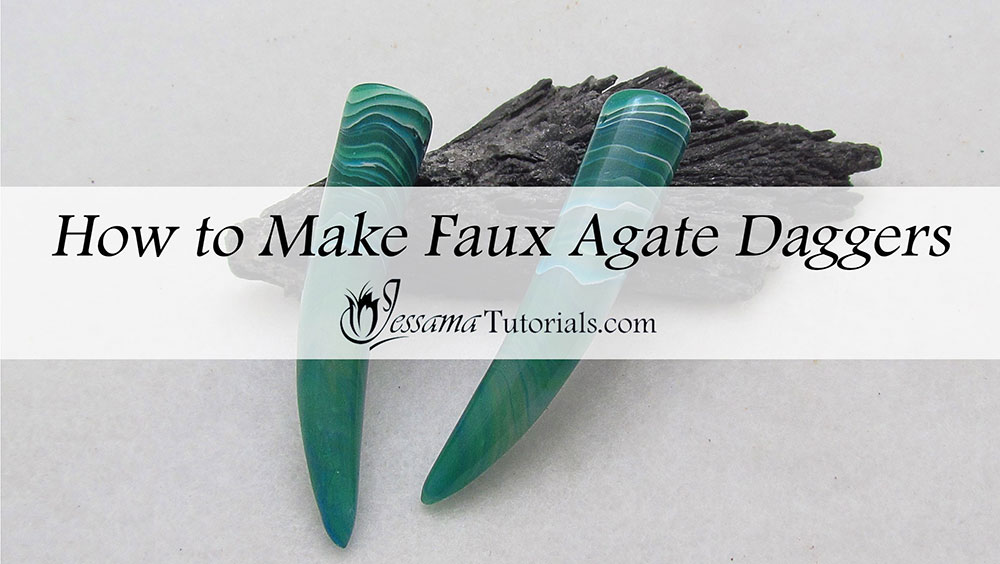
Create beautiful Faux Agate polymer clay pendants using a technique that can be used to create anything from Botswana Agate to Blue Lace Agate just by tweaking the colors and patterns. A little twist here and there and you could end up with a completely different faux stone.
Agate is one of my
favorite gemstones. There are so many variations available, from Red Agate to Crazy Lace Agate. Wouldn’t it be great if you could create an imitation?
That’s exactly what I’m going to show you how to do in this polymer clay tutorial.
You will need the following supplies:
- Translucent polymer clay (I’m using Premo)
- White polymer clay (I’m using Premo)
- Alcohol inks (I’m using Adirondack alcohol ink Clover, Sailboat Blue and Amethyst)
- A tissue blade
- An acrylic roller
- A pasta machine
- Piercing pins
- A hand held drill
- Varathane varnish
- A brush
- An oven
- A place to suspend your daggers while the varnish dries (I’m using a bead baking rack)
Steps To Making Faux Agate Polymer Clay Daggers
- Roll out three pieces of translucent polymer clay on the thickest setting on your pasta machine
- Drip your alcohol ink on to the pieces so that you have one green, one blue and one purple. Please keep in mind that you don’t need a lot of ink to color the clay. Three to four drops per 3cm by 3cm piece will do.
- Smooth the alcohol ink across the pieces, using your fingers or a brush, and let dry for about ten minutes.
- Now mix the alcohol ink into the translucent by hand (You don’t want that alcohol ink all over your pasta machine). You can mix it part way so that you have streaks still or you can mix it until you’ve got a full color. I’m mixing the whole way.
- You should now have three balls of tinted polymer clay: green, blue and purple. I’m just using the green and blue today. You can make your own faux agate in purple using the same technique.
- You now need a piece of white clay. I like to smooth my alcohol ink out by hand so my hands are a little dirty at the moment. That’s what you want because as you condition the white before putting it through the pasta machine that alcohol ink on your hands will get into the white and make it off-white. That’s good because it will mute the brightness.
-
Now to start assembling. Take a small ball of white and stick it onto your tile. Take a small ball of green and place it next to the white. Now a ball of blue above the green and then a ball of green next to the blue and above the white. You should have four balls in a rough square shape. Repeat again in random combinations on top of the first balls. Carry on doing this until you think you have enough polymer clay for the beads you want to make.
What I like to do is start with white and the two alcohol ink colors and as I get to the middle of the stack I’ll start to replace some of the white with translucent and as I reach the end I’ll take away the white. This results in the white and the two colors at the bottom slowly fading to translucent. I find this gives it a realistic look. - Now that you have your stack, roll it on your work surface and form it into a log.
- Now start twisting. Carry on until it looks like enough. You may have to stop and compress your log and begin twisting again a few times. You want quite fine lines, but not so fine that you lose the detail.
- Pinch the end of the log into a point. The end that has no white should be the thin end of the dagger. Roll on your work surface until it looks like a dagger. Shape the pointed end of the dagger into a slight curve.
- It’s now ready to bake for an hour at the brand's recommended temperature. Bake on a piece of cloth or a bed of tissues to avoid shiny spots.
- Once baked and cooled, sand the bead. It will bring out the translucent and the daggers need to be smooth before varnishing.
- Now you need to drill holes at the thick end of the dagger. I use a hand held drill to drill my holes. (If you don't have a drill, you can use a piercing pin to create your holes while your clay is still raw.)
- Varnish your beads. I’m using Varathane today. I suspend the daggers from a bead baking rack while the varnish dries. Always wait about twenty four hours for the Varathane to completely cure.
- If you’re using Varathane you can bake your beads after the varnish has cured. Bake at a rather low temperature (around 100C) for fifteen minutes.
Suggested links
If I have missed something, or you still have questions, please leave a comment below.
You can like my Facebook page or join the Jessama Tutorials Polymer Clay Community on Facebook to stay up to date with more polymer clay tutorials like this one as they are released.


Please leave your comments below: