You are here: Home >> Polymer Clay Earring Tutorials > Faux Tiger Eye Earrings
Faux Tiger Eye Polymer Clay Earring Tutorial
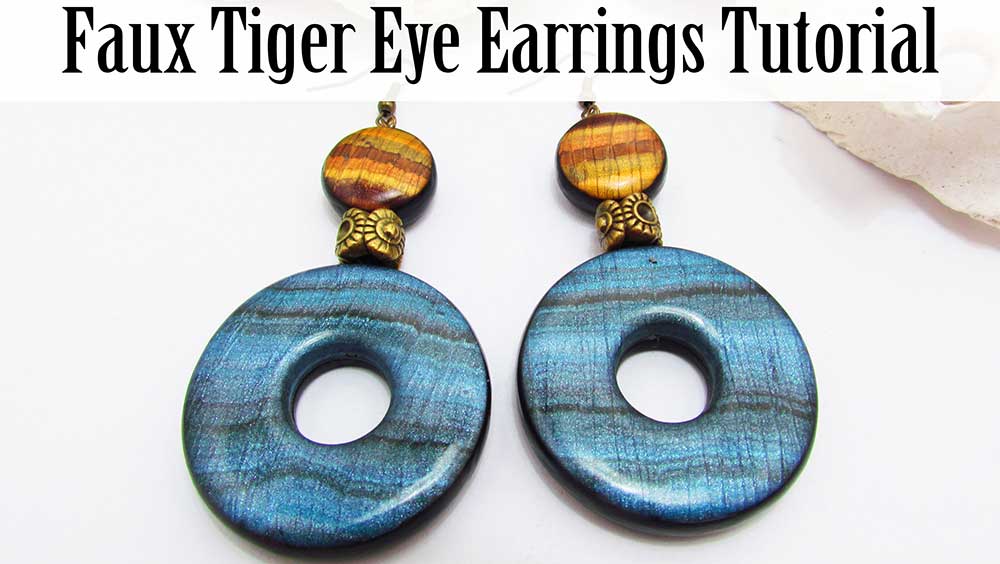
In this faux Tiger Eye tutorial we will be learning how to imitate the beautiful blue Tiger Eye stone - one of my favorites.
We will be making some gorgeous African inspired, reversible earrings and some lovely cabochons which will be buffed to a perfect shine. I'll be giving lots of sanding and buffing tips in this video to help you get the best shine from your clay, so be sure to watch all the way through.
You will need the following supplies:
- Polymer clay: Cobalt, Pearl White, Black, Graphite Pearl, White Translucent, Ultramarine Blue (Premo)
- Faux gold tiger eye
- A tissue blade
- A pasta machine
- An acrylic roller
- An oven
- A donut cutter (Circle donut #3-40)
- Mini circle cutters
- Piercing tool
- Scratching tool
- Cabochon molds
- An extruder (optional)
- Plain printing paper
- Spiral texture roller
- Bake and bond liquid clay
- Mica powders (Jurassic Bronze, Ancient Medallion)
- Sandpaper
- Polishing Papers
- A buffing wheel
- Brass spacer beads
- Brass headpins, Jumprings, ear wires
- Pliers
- A pin drill
The Faux Tiger Eye Earrings Tutorial Step by Step
Preparing the Clay-
You need nine colors of Premo polymer clay mixed according to the following recipes:
- Color 1: 4 white translucent, 2 Pearl white, 1 cobalt, 1 graphite pearl
- Color 2: 4 white translucent, 4 Pearl white, 3 cobalt, 1 graphite pearl
- Color 3: 4 white translucent, 3 graphite pearl, 1 cobalt
- Color 4: 4 white translucent, 6 Pearl white, 3 ultramarine, 1 cobalt, 1 graphite pearl
- Color 5: 4 white translucent, 2 Pearl white, 3 ultramarine, 1 graphite pearl
- Color 6: 4 white translucent, 6 Pearl white, 6 ultramarine, 1 graphite pearl
- Color 7: 4 white translucent, 3 graphite pearl, 3 ultramarine
- Color 8: 4 white translucent, 4 graphite pearl, 2 cobalt, 1 black
- Color 9: 4 white translucent, 5 black
- You will also need some white translucent.
- Roll each color out into very thin snakes, or use an extruder to speed up the process.
- You need most of the snakes to be very thin and a few thicker ones.
- Lay your snakes randomly beside one another, adding in some translucent every three to four snakes.
- Keep going until you have made a good size sheet, then trim away the ends.
- Cover with plain printing paper and burnish until the snakes are all stuck together.
- Fold the sheet in half and run through the pasta machine on the middle setting and then repeat on setting 2 (about 0.5mm)
- Fold in half again and rerun through on the middle setting.
- Repeat until the colors just begin to blend into one another. Usually three to four rolls will be enough.
- Roll out a piece of light blue clay for a backing and lay the Tiger Eye sheet over it. Smooth it out removing any bubbles.
- Create gentle folds in your sheet to distort the lines - see the video.
- Run through the pasta machine on the thickest setting.
- Scratch your veneer using a piercing pin, perpendicularly to the stripes.
- Cover with Deli paper and burnish until all the scratches are out.
- Repeat using the scratching tool and reburnish.
- Check for air bubbles and slit them out.
- Get a rough idea of where you want to cut your earrings from by laying your cutter over your clay. Cut this piece of the veneer out and put the rest aside.
- Run the veneer through the thickest setting on your pasta machine and then place on a black backing sheet rolled out at 1mm thick. Smooth out to eliminate air bubbles and trim away the excess black.
- Take the veneer you put to the side and trim it up.
- Push your clay into a mold of your choice. I will be using some from my shop, JessamaDesign.
- Fill up the mold with scrap pieces and fold over the edges of the veneer. Roll flat with your acrylic rod. Cut away the excess clay.
- Remove the cabochon from the mold, clean up the edges and place on a piece of deli paper.
- Smooth the veneer with the black backing firmly onto your work surface.
- Use a cutter of your choice to cut out a pair of earrings. I will be using my #3 donut cutter - size 40mm from JessamaDesign.
- If you are using a donut cutter, use a pin tool to remove the center.
- Smooth over any imperfections.
- Place in the oven on your tile for 30 minutes to set or set with a heat gun.
- Allow to cool and remove from your tile. Smooth out the back.
- Bring over a sheet of gold Faux Tiger Eye. You can learn how to make it on my Patreon community or here.
- Cut out two small circles. I am using the largest of my mini circle cutters.
- Smooth off the edges and then smooth the tops while on a piece of paper. This will smooth off the backs too.
- Repeat the whole process to create a reverse set of Faux Tiger Eye Polymer Clay Earrings.
- Bake both earring sets and the cabochons for an hour at Premo's recommended temperature.
- Set the cabochons aside to be sanded later.
- Roll out a sheet of black Premo polymer clay on the thickest setting and use a texture of your choice to add a texture to it. I am using my Spiral Roller.
- Lay your donuts down to get an idea of how much backing clay you need, then trim the excess away.
- Brush your clay with mica powders of your choice to create a brass effect.
- Lift up your sheet and place it to the side.
- Clean up your work area.
- Smear the back of your donuts with liquid clay. I am using Sculpey Bake and Bond.
- Stick your donuts onto your black backing and trim away.
- Smooth off the edges using your fingertips.
- Cut out the center.
- Spray a wetwipe with alcohol and remove some of the mica powder from the back.
- Bake again for an hour at Premo's recommended temperature.
- Clean up the edges of all the earring pieces using the Jessama Smear Technique.
- Bake again for 30 minutes.
- Sand your pieces. Start by lightly wet sanding the fronts with 1200 grit wet/dry sandpaper.
- Next use polishing papers and sand the front, back and sides through the grits from 600 to 8000.
- Buff using a soft cloth or a rotary buffing tool.
- Repeat with your cabochons.
- Drill one side of each donut, perpendicular to the Tiger Eye stripes.
- Drill the round pieces straight through, perpendicular to the Tiger Eye stripes
- Feed a flat headpin through the hole in the first donut, and use your round nose pliers to form a small loop.
- Attach a small jumpring to the loop.
- Trim the end off of another headpin. Make a loop on one end, open it and pop onto the jumprings on the donut. Reclose it.
- Thread on your spacer, then your Faux Tiger Eye round. Make a loop on the other end and use a jump ring to attach an earwire.
- Repeat for the other earrings.
Suggested Links
- Desert Jewel Gold Tiger Eye Tutorial on Etsy
- Desert Jewel Gold Tiger Eye Tutorial on Patreon
- Red Tiger Eye tutorial
- Jessama Smear Technique
Buy Supplies
- Circle Donut Cutter #3
- Mini Circle Cutters
- Spiral Texture Roller
- Buffing Wheels
- Polishing Papers
- Cabochon Molds
- Jurassic Bronze Mica Powder (17)
- Ancient Medallion Mica Powder (35)
- Piercing Tool
- Scratching Tool
- Extruder
- Pin Drill
- Deli Paper
If I have missed something, or you still have questions, please leave a comment below.
You can like my Facebook page or join the Jessama Tutorials Polymer Clay Community on Facebook to stay up to date with more polymer clay tutorials like this one as they are released.
You may also like:
You are here: Home >> Polymer Clay Earring Tutorials > Faux Tiger Eye Earrings


Please leave your comments below: