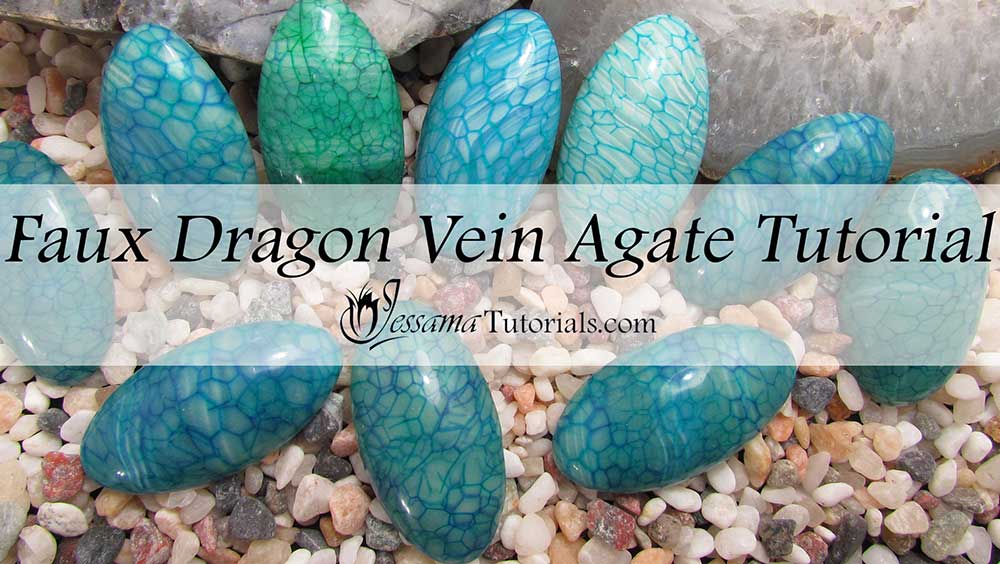
Faux Dragon Vein Agate Polymer Clay Tutorial
In this tutorial I’ll be showing how to make faux Dragon Vein Agate cabochons. We will be using a faux agate sheet and a crackle cane to achieve the result, and all you will need is some white and translucent polymer clay, and a couple of alcohol inks.
Dragon Vein Agate comes in many different forms and I'll be showing how to imitate a few different ones in this tutorial. There are endless possibilities to mess around with once you have the base sheet and cane, so this is a tutorial you can really have fun with.
You will need the following supplies:
- Translucent polymer clay
- White polymer clay
- Alcohol ink (I'm using Adirondack Turquoise and Sailboat Blue)
- A tissue blade
- A pasta machine
- An acrylic roller
- A plain piece of paper
- Cabachon Mold
- An oven
- Wet/dry Sand paper or polishing cloths
- A heat gun
- Translucent Kato liquid clay
How to Make Faux Dragon Vein Agate from Polymer Clay
Preparing the Clay-
You need four sheets of polymer clay:
- Two sheets made up of a mix of 1 part white to five parts translucent.
- Two translucent sheets.
- Tint one of your two white mix sheets using a couple of drops of your Sailboat Blue alcohol ink. Run the clay through your pasta machine to blend in the color.
- Tint one of your two translucent sheets using about 8-10 drops of your Sailboat Blue alcohol ink. Run the clay through your pasta machine to blend in the color.
- You should now have a Sailboat Blue translucent sheet, a plain translucent sheet, a lightly tinted white mix sheet (your color should resemble Robin's Egg), and a plain white mix sheet.
- Roll each sheet of clay into a log about half a centimeter in diameter.
- Lay them next to one another and trim off the uneven ends.
- Slice the logs into small pieces.
- Take a piece of each color and place them in a block of four.
- Stack groups of four one on top of the other. You can choose how much of each color to use. (See the video for more info.)
- Roll and squish each stack together and start to slowly twist as you roll and stretch. (See the video for more info.)
- Keep going until your lines are very fine.
- Gently squish your snake back into a slab, back and forth until you have about 5cm of clay. (See the video for the process.)
- Flatten your slab and then roll through the pasta machine on the thickest setting, being sure to lengthen the lines.
- Manipulate with your fingertips to distort the lines.
- Run through the pasta machine settings until you reach the middle setting alternating between stretching and widening the lines, until the sheet is flat.
- Roll five pieces of translucent Premo into logs of graduating diameter.
- Chop each log in half.
- Run a line of one color ink along one piece and a line of the other color along the other piece of each log, and roll until the outside of the log is covered. You should end up with 5 Sailboat Blue logs of graduating diameter and 5 Turquoise logs of graduating diameter.
- Lay your logs next to one another and on top of one another, varying the color and width randomly.
- Trim off the rough ends and then cut into sections of equal length.
- Take each section and turn them on their ends.
- Place them all together and squish into a rough round, then reduce to form a cane.
- Square up the cane and use your tissue blade to slice the stained edges of the cane away.
- Trim away the rough ends.
- Slice your cane into thin slices.
- Lay the slices over your agate sheet with overlapping until it is covered. Add a second thinner layer of cane slices to add interest.
- Flatten the sheet with your acrylic roller.
- Cover the sheet with a piece of plain printing paper and burnish with your roller to smooth it out further.
- Trim off the rough edges.
- Press together all your leftover offcuts into a ball.
- Press into your mold and use the acrylic rod to push it in well. Slice off the excess with your tissue blade.
- Remove the cabochon from the mold and cover with your faux Dragon Vein Agate sheet.
- Roughly trim away the edges, wrap excess around the cabochon and return to the mold.
- Roll gently with your roller until flat and then carefully trim away the excess using a stiff blade.
- Remove from the mold and smooth over with the heel of your hand.
- Reshape using the edge of your tissue blade.
- Repeat using translucent instead of leftovers underneath the Agate sheet for a different effect.
- Bake for 45 minutes at the recommended temperature.
- Sand using wet/dry sandpaper or polishing papers, starting from the lowest grit through to the highest. I sand up to an 8000 grit.
- Buff using a soft cloth or buffing wheel.
- Apply a coat of Renaissance Wax or liquid clay if you like.
Suggested Links
- Debbie Crothers Liquid Clay Tutorial
- Patreon Liquid Clay Varnishing Tutorial
- Faux Agate Dagger Tutorial
Buy Supplies
If you have any questions, please leave a comment below.
You can like my Facebook page or join the Jessama Tutorials Polymer Clay Community on Facebook to stay up to date with more polymer clay tutorials like this one as they are released.


Please leave your comments below: