You are here: Home >> Polymer Clay Home Decor > Enchanted Leaf Bowl
Enchanted Leaf Polymer Clay Bowl Tutorial
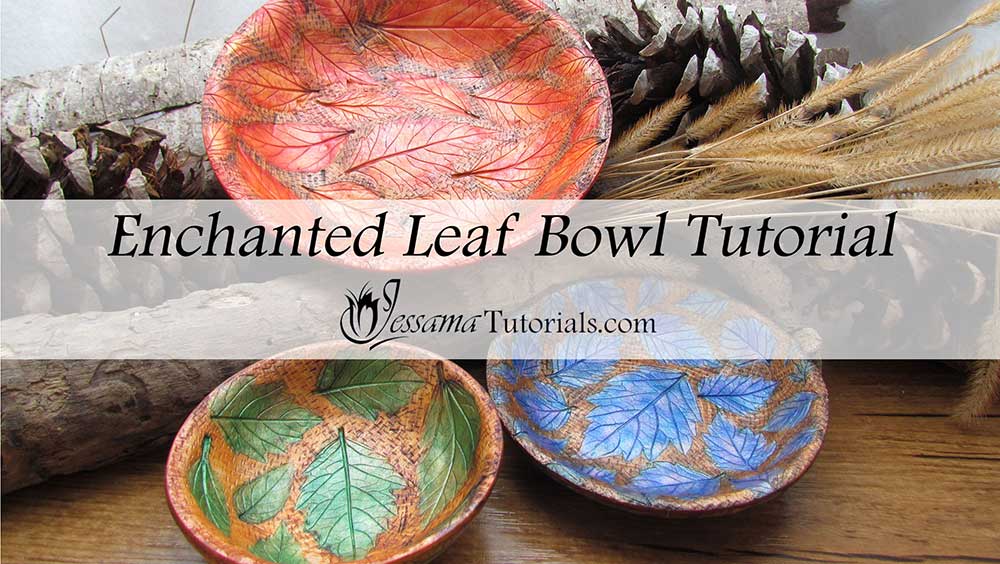
In this tutorial I'll be showing you how to make a polymer clay bowl using leaves from your garden and a few alcohol inks.
I'll show you three different color variations using the same technique. You can come up with your own unique design to match the decor in your house. Try the project with different sizes and shapes of leaves, vary the background texture and change up the colors to create beautiful polymer clay bowls that you can use all around the house.
You will need the following supplies:
- A bowl
- Pearl white polymer clay
- A tissue blade
- A pasta machine
- An acrylic roller
- A craft knife
- An oven
- Alcohol ink (I’m using Adirondack Teakwood, Latte, Espresso, Amethyst, Purple Twilight, Sailboat Blue and Stonewashed)
- Bake and Bond or other translucent liquid clay
- A brush
- A basket texture (Sandpaper will work too)
- 99% alcohol
- Leaves with prominent veins
- Coarse sandpaper (80 or 120 grit)
How to Make The Enchanted Leaf Polymer Clay Bowl Step by Step
The Inside of the Polymer Clay Bowl- To start with, you will need a sheet of pearl white polymer clay rolled out on the thickest setting of your pasta machine.
- Lay the sheet over your chosen bowl and press it firmly into the bowl, starting from one side and working your way across to minimize air bubbles.
- Fold the excess clay over the sides of the bowl.
- Smooth out the surface of the bowl with your fingertips, preferably while wearing gloves or fingercots.
- Turn your bowl over, release the clay from the outside of the bowl and trim around with your craft knife, while pressing the blade against the side of the bowl.
- Use your fingertips to pull the edges of the clay over the top edge of the bowl to create a small lip. We will trim that up later.
- Check for air bubbles. If you find any, slit them with your craft knife and smooth out with your fingertips.
- Lay one leaf at a time, vein side down, in your bowl. Push the leaf into the clay, working from one side to the other. Try to vary the size of the leaves to add interest. You can also add different types of leaves.
- Lay the leaves fairly close to one another, but not too close, until the entire bowl is covered.
- Use a textured paper, or sandpaper, to texture the areas between the leaves.
- Next we will color the background with alcohol ink. I am using Teakwood, Espresso and Latte.
- Drip a few drops of your lightest color onto your working tile and spray with 99% alcohol to make the ink more fluid and to lighten the color. Paint it over the entire bowl using a small brush. Work quickly, because the ink will dry up.
- Repeat with your second color, but only paint in patches this time.
- Do the same with the third color.
- Use a wet wipe to clean your brush and your tile, then start again with your lightest color, mixed with alcohol, to blend the colors together.
- Allow the ink to dry for a while.
- Use the tip of your craft knife to gently pick the leaves out of the clay.
- To color the leaves I will be using Amethyst, Purple Twilight, Sailboat Blue and Stonewashed.
- I'm using Stonewashed as the base.
- Thin your ink out as before and paint inside the leaves.
- Paint your second color in patches and spots.
- And repeat with your third and fourth color. (I added some Purple twilight as my fourth color, but it was well thinned out to lighten it.)
- Clean up your tile.
- Spray a wet wipe with alcohol and use it wipe across the background of the bowl to reveal the pattern a bit more.
- Turn your bowl upside down and trim the edges.
- Smooth the edge with your fingertips.
- Bake in the oven for 40 minutes at the recommended temperature.
- When the bowl has cooled, gently release the clay and remove.
- Turn the clay bowl upside down and gently scrape along the rim using your craft knife to remove any straggly bits.
- Scratch the back of the bowl with a coarse sandpaper. 80 to 120 grit works well. This will help to create a strong bond with the next layer of clay.
- Smear with a light layer of Bake and Bond or other translucent liquid clay.
- Roll out a sheet of pearl white clay on the thickest setting, and lay over the back of the bowl, pressing down to release air bubbles. Make sure to press and smooth very well around the rim.
- Roughly trim the excess clay away with your craft knife.
- Pinch the excess over the sides and smear it off instead of trimming. This will provide a better bond and make less of a seam.
- Smooth around the rim with your fingertips.
- If there is any raw, white clay peaking out from the edges, scrape it away gently with your knife.
- Apply the leaves as before.
- Apply the texture between the leaves as before.
- Color the background as before. I will be using the same colors.
- When the inks are dry, use the tip of your knife to lift up the leaves.
- Trim carefully again to remove any distortion that occurred when you were pressing the leaves and texture in.
- Use a brown ink to color the rim.
- Clean up your tile.
- Color the leaves as before.
- Rub gently with a wet wipe to reveal the texture.
- Bake for an hour at the recommended temperature.
If I have missed something, or you still have questions, please leave a comment below.
You can like my Facebook page or join the Jessama Tutorials Polymer Clay Community on Facebook to stay up to date with more polymer clay tutorials like this one as they are released.
You may also like:
You are here: Home >> Polymer Clay Home Decor > Enchanted Leaf Bowl


Please leave your comments below: