You are here: Home >> Polymer Clay Earring Tutorials > Kelp and Bubbles Polymer Clay Earring Project
Kelp and Bubbles Polymer Clay Earring Project
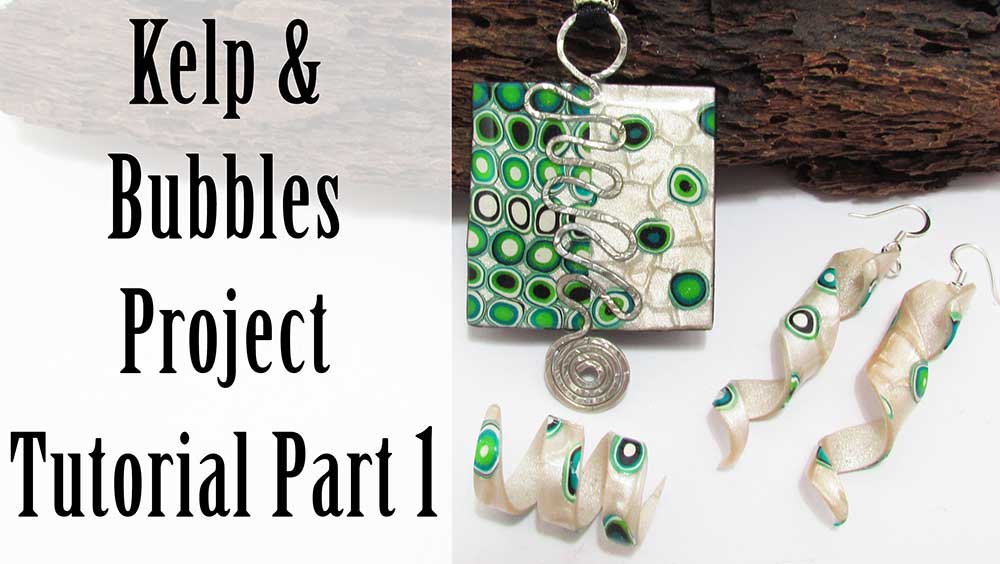
This polymer clay earring project is the first part in a 2 part series where we will be using the simple mod cane to create a matching pendant, earring and ring set.
Although there are quite a few different techniques in this tutorial, these interesting and eye-catching earrings are really simple, quick and fun to make. You can switch up the colors to make endless designs, all of which will be perfect for the markets.
You will need the following supplies:
- White, black, pearl white, peacock pearl, bright green pearl (Premo)
- Pearl white mica powder
- Silicone texture (cracked earth)
- Sponge texture
- A brush
- An extruder
- Mini circle cutters
- A tissue blade
- A pasta machine
- An oven
- Wooden mandrels
- Liquid clay translucent
- Deli paper
- A pin drill
- Sandpaper/ Polishing papers
- Uv resin
- Jumprings
- A brush
- Ear wires
The Kelp and Bubbles Polymer Clay Earring Project Step by Step
Making The Mod Cane- To start you’ll need a sheet of white, black, pearl green and peacock blue Premo polymer clay rolled out on your thickest setting.
- Use a small circle cutter to cut a bunch of circles out of each sheet.
- Remove the excess clay, then stack the circles together in a random pattern.
- Insert your log of circles into your extruder. (Reduce it a little if it is too thick to fit.)
- Choose a large circle disc and close up the extruder.
- Twist the handle and extrude in one long tube. Clean up your extruder.
- Chop off the distorted ends and roll to smooth it out.
- Roll out a sheet of pearl white clay on the thickest setting.
- Texture using a stamp of your choice. I will be using my Cracked Earth stamp.
- Press a sponge texture onto the clay before removing it from the stamp. I have brushed mine with some pearl white mica powder.
- Trim the edges then shave off the raised areas to create a mica shift.
- Cover with a sheet of deli paper and burnish flat.
- Cut several thin slices from various parts of your Mod Cane.
- Lay the slices randomly over your mica shift.
- Cover with a sheet of deli paper and burnish flat again.
- Re-texture the back if you need to.
- Cut a long, narrow triangle from your veneer. Trim the top at an angle. (See the video for the shape and size.)
- Wrap the triangle around a wooden mandrel to test it.
- When you are happy with the shape, use it as a template to cut out a second piece. These will be your earrings.
- Cut out a long narrow strip for the ring. Taper off either end.
- Add a drop of translucent liquid clay to either end, then wrap it around a large wooden mandrel. (Large enough so that the ring will fit your finger.)
- Gently smooth it off using a tissue sprayed with alcohol and set to the side.
- Repeat with the two earring pieces on a narrower mandrel.
- Bake for around 40 minutes at the recommended temperature.
- Use a 400 grit and sand to remove dirt before removing from the mandrels.
- Remove from the mandrels.
- Use a pin or push drill to drill a hole through the top of each earring bead.
- Put all of your pieces back onto the mandrels.
- Brush on a coat of UV resin and place inside a UV lamp to cure.
- Once cured, use a jump ring to attach an earring wire to each earring piece.
I hope you enjoyed that. Check out part two where we will be making a matching pendant.
Suggested links
Buy Supplies
If I have missed something, or you still have questions, please leave a comment below.
You can like my Facebook page or join the Jessama Tutorials Polymer Clay Community on Facebook to stay up to date with more polymer clay tutorials like this one as they are released.
You may also like:
You are here: Home >> Polymer Clay Earring Tutorials > Kelp and Bubbles Polymer Clay Earring Project


Please leave your comments below: