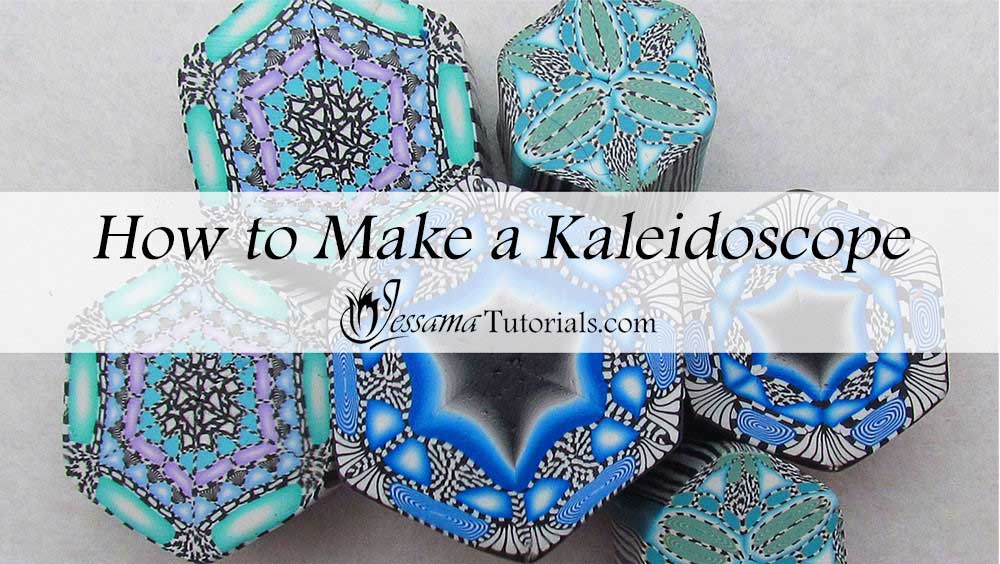
Polymer Clay Kaleidoscope Cane Tutorial
In this polymer clay tutorial I'll be showing you how to combine some of the basic canes to make a beautiful Kaleidoscope Cane. It's easy to create different versions of this cane, just by changing out the base canes you combine.
In order to make this complex cane, you'll need to know how to make all of the base canes listed in the supplies section. The tutorials for these canes are listed in the suggested links box below the video.
You will need the following supplies:
- A Jellyroll Cane
- A Skinner Blend Bulls Eye Cane
- A Skinner Blend Plug
- A complex Bulls Eye Petal Cane
- A Striped Border Cane
- A Spiralled Striped Border Cane
- A tissue blade
- An acrylic roller
How to Make a Polymer Clay Kaleidoscope Cane Step by Step
-
To start you’ll need to gather together the base canes you need for this project:
- A Skinner Blend Plug
- A Skinner Blend Bulls Eye
- A Complex Bulls Eye Petal Cane
- A Striped Border Cane
- A Spiralled Striped Border Cane
- A Jellyroll Cane
You can make the canes in whatever colors you like. - Mold the Skinner Blend Plug into a rough triangular shape. This will be the center of the cane.
- Wrap the Jellyroll cane once with the Striped Border Sheet.
- Take your Bordered Jellyroll and flatten it out into an oval shape rather than a round shape.
- Reduce your Petal Cane so that you can cut it out into two pieces that will go on either side of your Jellyroll.
- Trim off the distorted ends and chop in half.
- You want the wide side of the Jellyroll sitting on the tile. Place the petals on both sides of the Jellyroll Cane, broadside down, and press against the Jellyroll.
- Flatten your cane out on the top.
- Now place the Striped Border Cane over the top of the Jellyroll and petals and down the sides.
- Reduce your Skinner Blend Bulls Eye until you can cut out two pieces that are the same length as the Jellyroll.
- Trim off the distorted ends and chop in half.
- Form your Spiralled Striped Border Cane into a triangle.
- Place one Skinner Blend Bulls Eye on top of the Jellyroll on one side and another on the other side.
- Place the Spiralled Striped Border Cane in the middle, point side down.
- Place another piece of the Striped Border Cane over the top and down the sides of the Skinner Blend Bulls Eye canes.
- Place the molded Skinner Blend Plug on top of the Striped Border Cane, point side up.
- The cane should have a rough triangular shape now.
- Reduce the cane into a triangular cane until you can cut six pieces.
- Remove the distorted ends and cut six pieces.
- Take the pieces and put them together in a hexagon. Match them up so that the pattern is the same all the way around.
- Press against your work surface and rotate. Continue this through all six sides to compress the cane.
- Trim off the ends to tidy the cane.
- Make sure to let the cane cool before slicing it.
See the video for the correct procedures for reducing the various canes.
I also show some examples of other Kaleidoscope canes in the video, so be sure to check that out.
suggested links
- How to Make a Skinner Blend
- Skinner Blend Plug Tutorial
- Making a Skinner Blend Bulls Eye Cane
- How to Make a Jellyroll Cane
- Striped Border and Spiralled Striped Border Cane
- Basic Bulls Eye Cane Tutorial
- Complex Bulls Eye Petal Cane
- More Kaleidoscope Canes
If you need more information on reducing your canes, take a look at my reducing polymer clay canes tutorial, where I show how to reduce round, square, triangular and hexagonal canes correctly.
If I have missed something, or you still have questions, please leave a comment below.
You can like my Facebook page or join the Jessama Tutorials Polymer Clay Community on Facebook to stay up to date with more polymer clay tutorials like this one as they are released.


Please leave your comments below: