You are here: Home >> Polymer Clay Bracelets and Cuffs > Baobab Tree Sunset Polymer Clay Bracelet Tutorial
Baobab Tree Sunset Polymer Clay Bracelet Tutorial
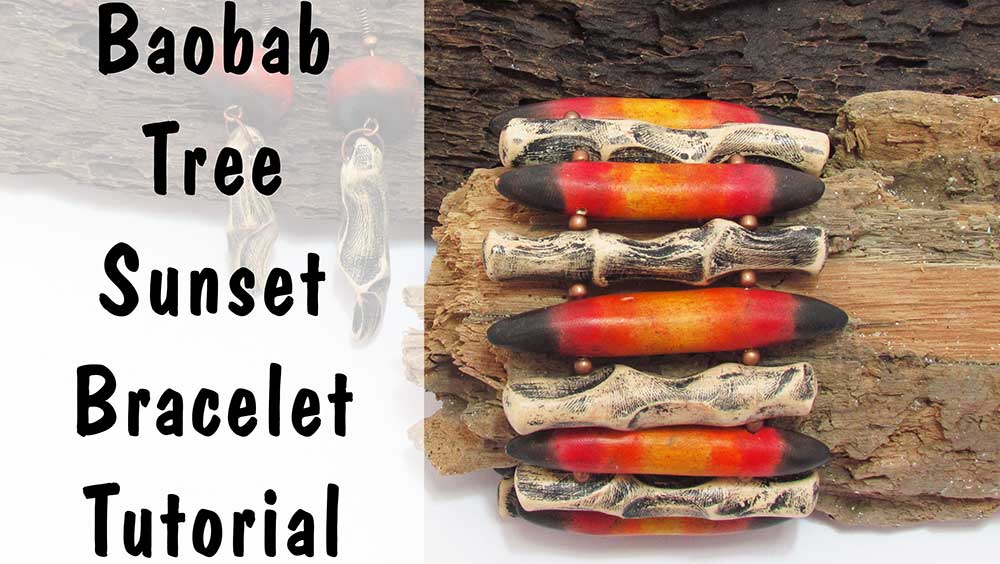
In this African inspired polymer clay bracelet tutorial, we will have fun making finger bone beads and sunset torpedo beads. The finger bead technique is really fun, and so effective.
All you need for this polymer clay project is some clay, pastels and paint. It's really simple, but we will create this beautiful, earthy sunset bracelet and in the video, I'll also show you how to make a set of earrings to match.
And something to look forward to - this is another project that does not need much sanding, so lots of fun without the painful bits!
You will need the following supplies:
- Ecru and white premo polymer clay
- A tissue blade
- A pasta machine
- Pastels
- A brush
- An oven
- A craft knife
- Black paint
- Sandpaper or polishing papers
- A pin drill
- Renaissance wax
- Buffing Wheel
- Elastic
- Antique copper jumprings, ear wires, eye pins
- Antique copper spacers
- Pliers
- Polybonder
The Baobab Tree Sunset Polymer Clay Bracelet Tutorial Step by Step
Making the Bracelet Elements- To start you’ll need a sheet of clay made from one part Ecru, one part white, rolled out on the thickest setting of your pasta machine. You need about 2oz.
- Next your will need a selection of brown pastels in warm tones.
- Scrape the pastels over the clay using your craft knife.
- Tap down with your fingers and then rub it in.
- Roll the clay up with the pastels facing inside, and roll into a thin log.
- Chop into sections and then split each section down the middle.
- Pull all the pieces together into a ball, then roll back into a log.
- Repeat the cutting and rolling together once more.
- Cut off a small piece and roll into a log around 1 and half inches long. Squeeze in your fist. See the video.
- Make about ten pieces like this.
- Cut a further ten pieces from your log.
- Roll these into balls and then roll each ball into a log, each the same length. Round off the ends of each log using your fingers.
- Choose some pastels in red and orange sunset colors, as well as black.
- Scrape some black pastel onto your work surface and use your fingertip to rub it around both ends of each log.
- Scrape piles of your other pastel colors onto your work surface and use a brush to add the colors to your logs, starting with red next to the black and working down to the lighter orange in the middle.
- Gently roll each log on your work surface to set the pastel into the clay.
- Pinch the end of each log into a torpedo shape.
- Take two more pieces of the ecru mix log, and roll into balls.
- Scrape a mix of sunset pastels onto your work surface and roll the balls in the pastel until they are covered.
- Flatten your two balls into rondelles and then use a brush to add black pastel to the top and bottoms.
- Roll two more small pieces into logs and squeeze in your fist.
- Bake all your pieces at the recommended temperature for an hour.
- Once cool use your fingertips to cover the entire surface of your finger beads with black paint.
- Allow to dry then use a wet wipe to remove some of the paint then use tissue to wipe some more.
- Drag a 400 grit polishing paper over the surface to finish off the antiquing process.
- Use a pin drill to drill a hole through either end of each bone bead and each torpedo bead. (Keep the two rondelles and smaller bone beads for the earrings aside).
- Drill a hole through the center of each rondelle and through the top of each earring bone bead.
- Lightly coat each piece with renaissance wax.
- Buff using a soft cloth or rotary tool.
- Add a jumpring to the top of each earring bone bead.
- Thread an eyepin onto each one and add a rondelle to each.
- Create a loop using your pliers, trim and string on an earwire. Close the loop.
- Cut two pieces of elastic for the bracelet.
- On each elastic, string your bone and torpedo beads alternating with copper spacers.
- Tie a knot in your elastics.
- Add a drop of Lisa Pavelka's polybonder to each knot. While drying, poke the knot into the hole of the bead and trim the elastic.
If you enjoyed this project, don't forget to check out the more fun projects on Patreon.
You can like my Facebook page or join the Jessama Tutorials Polymer Clay Community on Facebook to stay up to date with more polymer clay tutorials like this one as they are released.
You may also like:
You are here: Home >> Polymer Clay Bracelets and Cuffs > Baobab Tree Sunset Polymer Clay Bracelet Tutorial


Please leave your comments below: